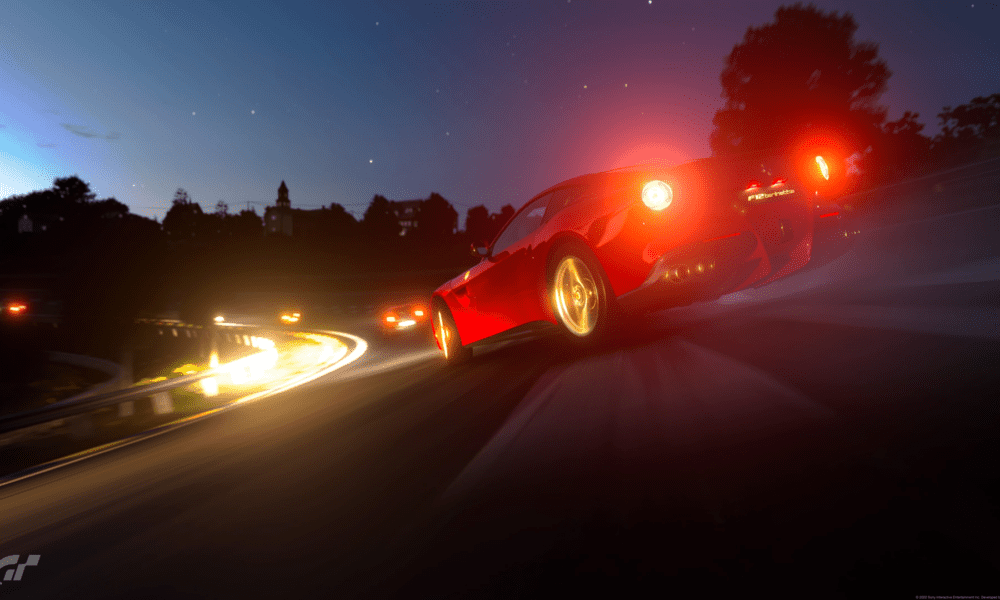
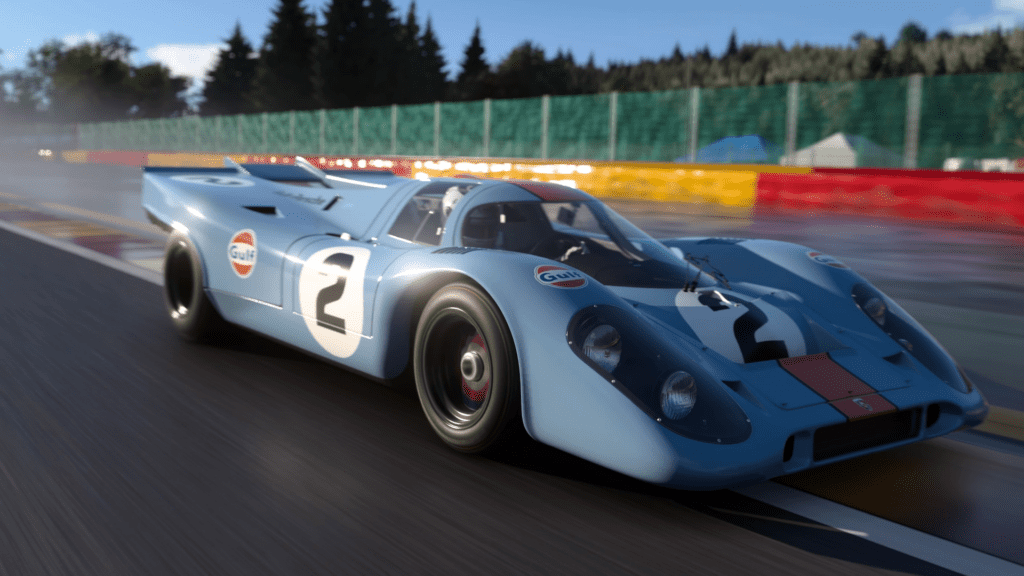
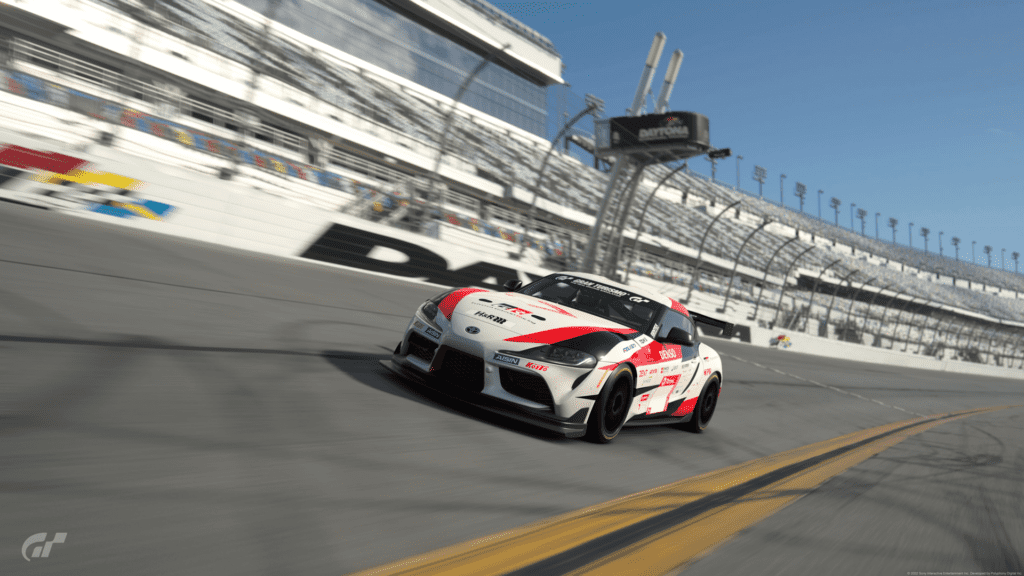
Gran Turismo 7 follows in the footsteps of previous games in the series by having a superlative photo mode, allowing players to take photos of their favourite car with fastidious attention to detail.
And now, using the PlayStation 5’s extra horsepower, you can capture all the curvaceous beauty of your souped-up Fiat 500 in glorious 4K.
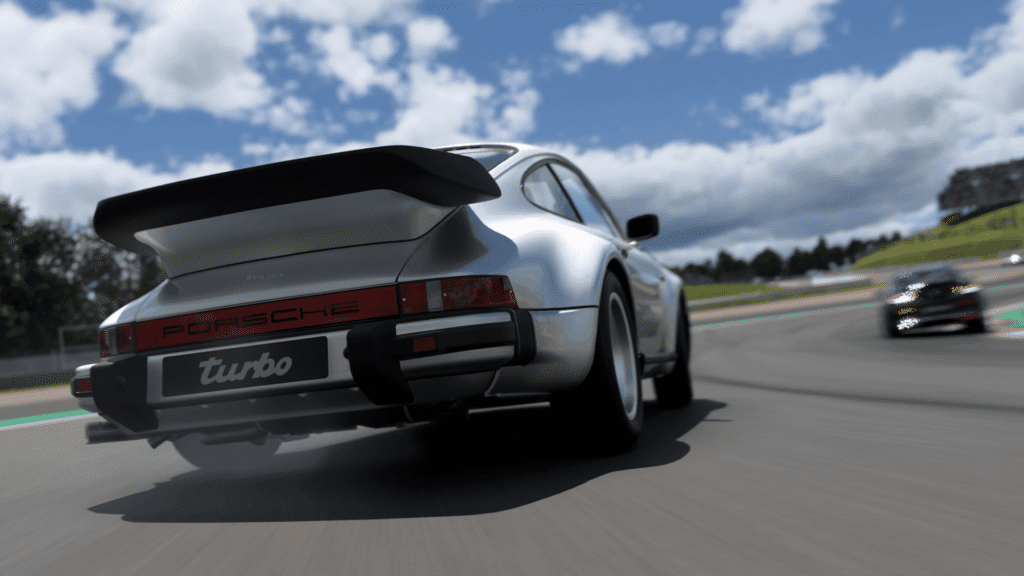
We at Traxion.GG are huge fans of photo modes, and recently voted Gran Turismo Sport (GT Sport) as having the best in any racing game – even after almost five years post-launch.
The man behind the Gran Turismo franchise – Kazunori Yamauchi – is a passionate real-life photographer, and ever since the photo mode was added to the series in Gran Turismo 4 we’ve been lucky enough to witness an ever-evolving and increasingly powerful way to take virtual images of the game’s cars.
GT’s photo mode has traditionally focused on realism. This means that the settings used to create a shot mimic those you’d find on a normal digital camera using its manual mode.
So that means you can adjust important settings like Aperture, Shutter Speed, and Exposure. We’ll describe and explain what these settings do later, but firstly let’s have a look at accessing Gran Turismo 7’s photo modes.
Setting up a photo in Gran Turismo 7
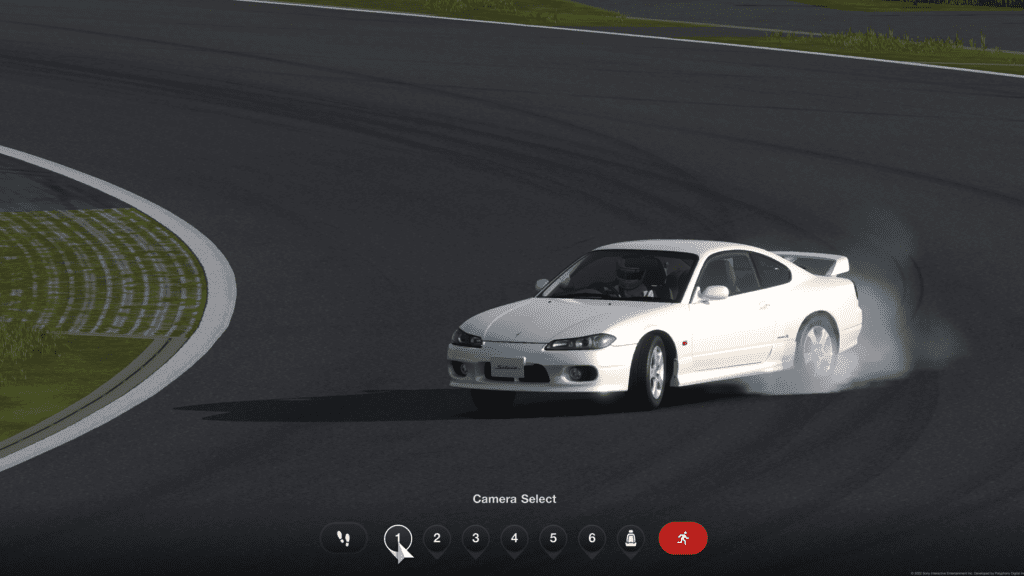
Accessing the photo mode in Gran Turismo 7 is easy. Simply run a Race, Time Trial, Driving Mission, Coffee Break, License Test or even a Sport Mode online race, watch the replay and hit the Options button to pause the action at a time you’d like to capture.
Then simply scroll to the ‘Race Photos’ option and hit Cross. This will open up the ‘Camera Select’ menu.
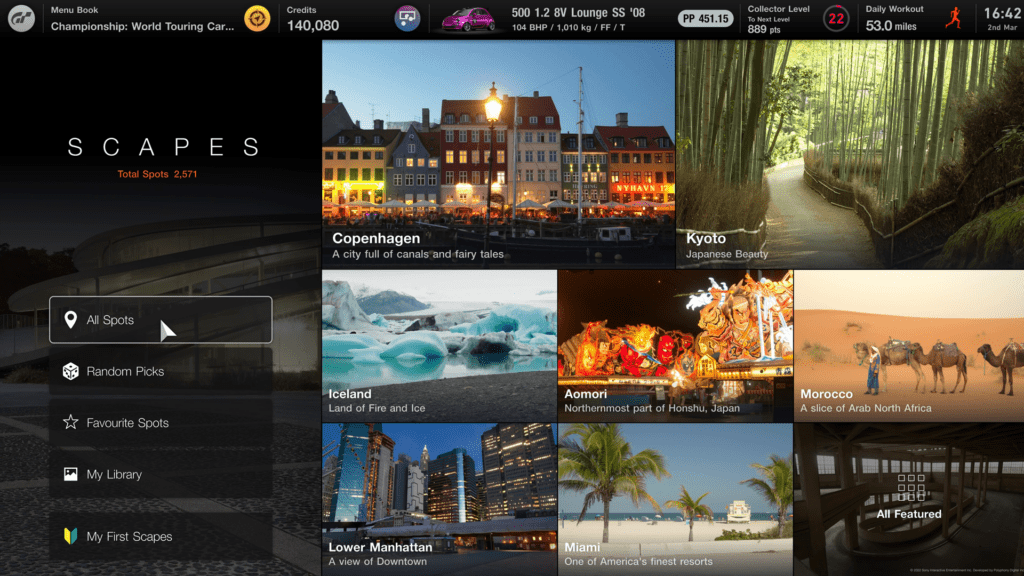
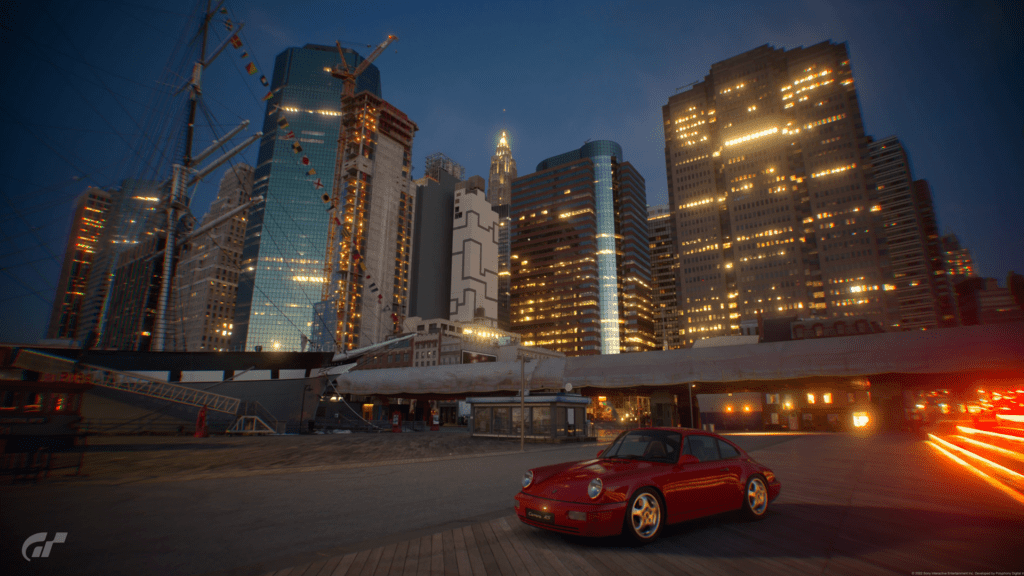
Alternatively, you can enter one of the 2,571 Scapes locations currently featured in the game and take advantage of some supremely detailed background vistas to further enhance the look of your car.
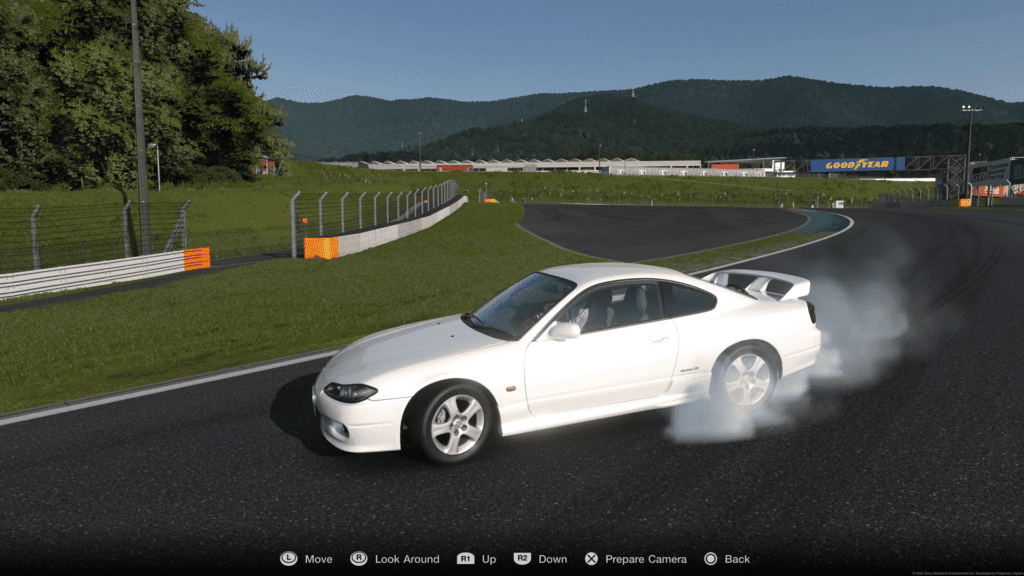
On the main ‘World Map’, Scapes are the furthest option to the left. Once you’ve selected an environment, the photography menu will also appear. From here, select a camera angle or use the ‘Walk Mode’ and hit Cross once more to bring up the photography settings.
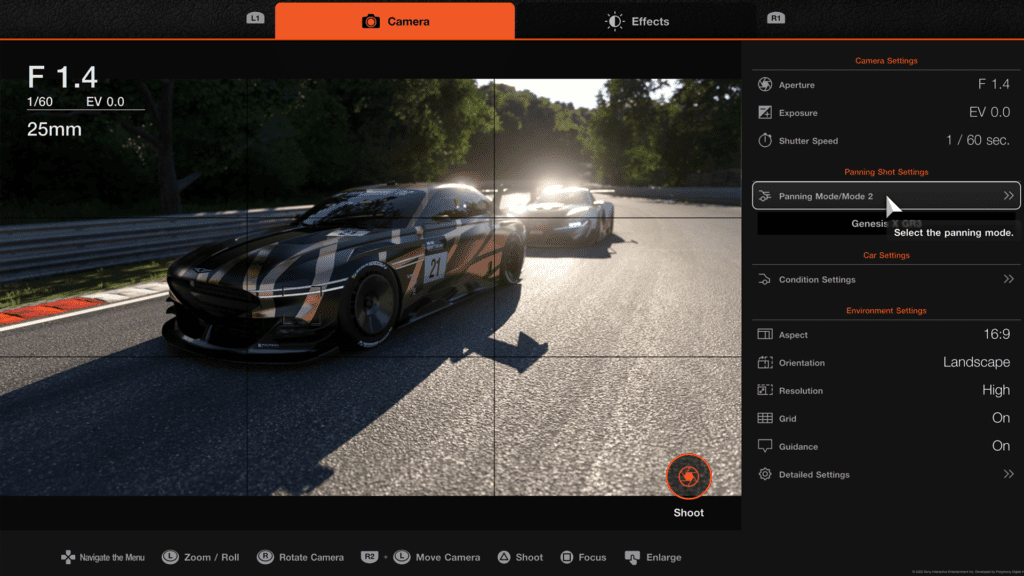
Photography mode UI
You will now enter the photo mode User Interface (UI). For this example, I used a Scape location, which will allow greater flexibility in terms of car positioning.
Taking a photo during a race situation will deny you the opportunity to change settings like Front Wheel Steering Angle, Headlights etc but you can still select any camera position you fancy and scroll through the set placements.
GT7’s photo mode consists of three sub-menus: Car, Camera, and Effects.
The Car menu is all about positioning your chosen vehicle; Camera allows you to set up assorted options such as shutter speed, exposure, panning settings etc; and Effects allows you to add a Vignette, alter the ‘warmth’ of the image and simulate camera lens peculiarities like Chromatic Aberration and Lens Distortion Effects…
Car
The settings here will allow you to position your car exactly how you’d like it – you can even add a second or third car to the Scape.
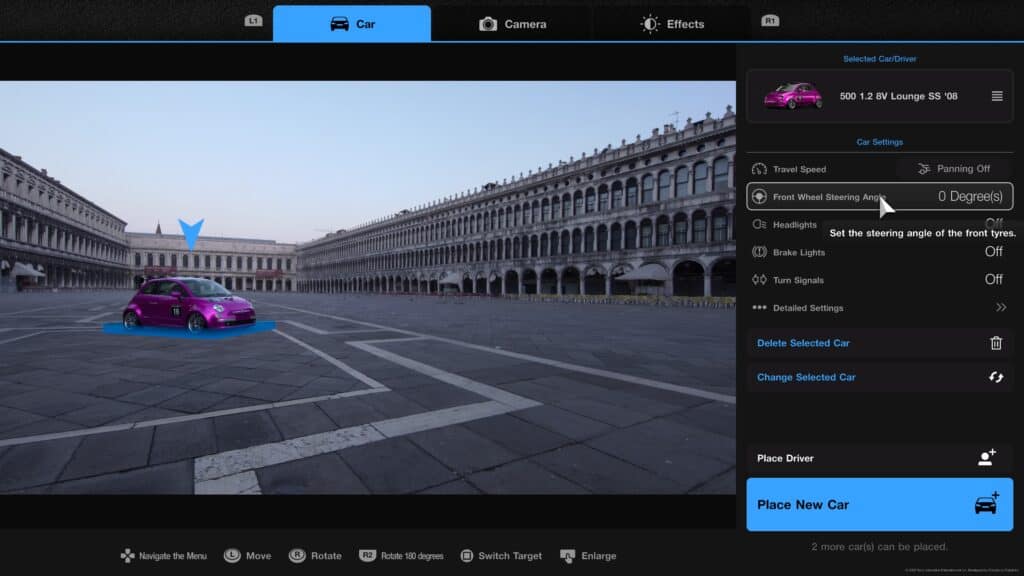
Here you can adjust where the car will sit on the Scape, the angle of the front wheels, and whether the headlights/brake lights/indicator/hazard lights are on/off. You can move the car around the Scape with a combination of the analogue sticks.
A blue box around the car will show that the position is acceptable, but should this turn red, you’ll have to move it somewhere else.
As an added bonus, you can also decide if the car is in motion or not by choosing its speed at the moment of capture, but you’ll need to set Travel Speed first. You can also place your driving avatar in the shot if so desired – remember to pick a suitably moody pose.
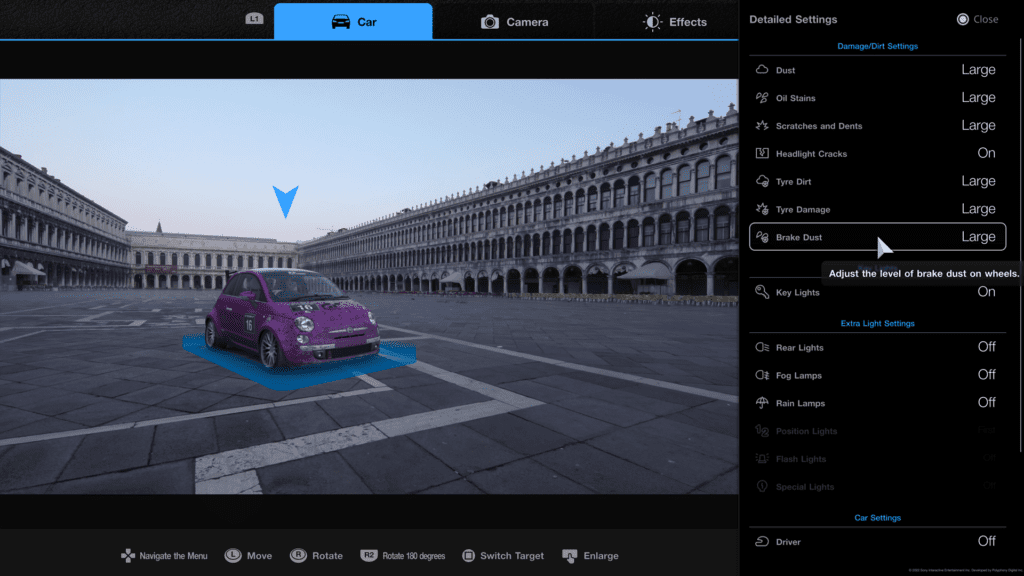
Within the ‘Detailed Settings’ option, you can add damage to your vehicle, or brake dust to the wheels and a layer of dust if you prefer. The latter could be good for a rally vehicle shot, although the damage looks somewhat out of place within a beautiful Italian plaza. How uncouth.
Camera
As I said in the introduction, Gran Turismo 7 follows the same principles of real photography, so I will try to explain the theory of the game’s Camera settings, as well as how they affect the final result.
Aperture
The aperture on a camera is essentially the opening that allows light in. A fully open aperture (lower f-stop numbers) lets more light in and creates more background and foreground blur. A more closed aperture (higher f-stop numbers) results in the whole image is much more in focus.
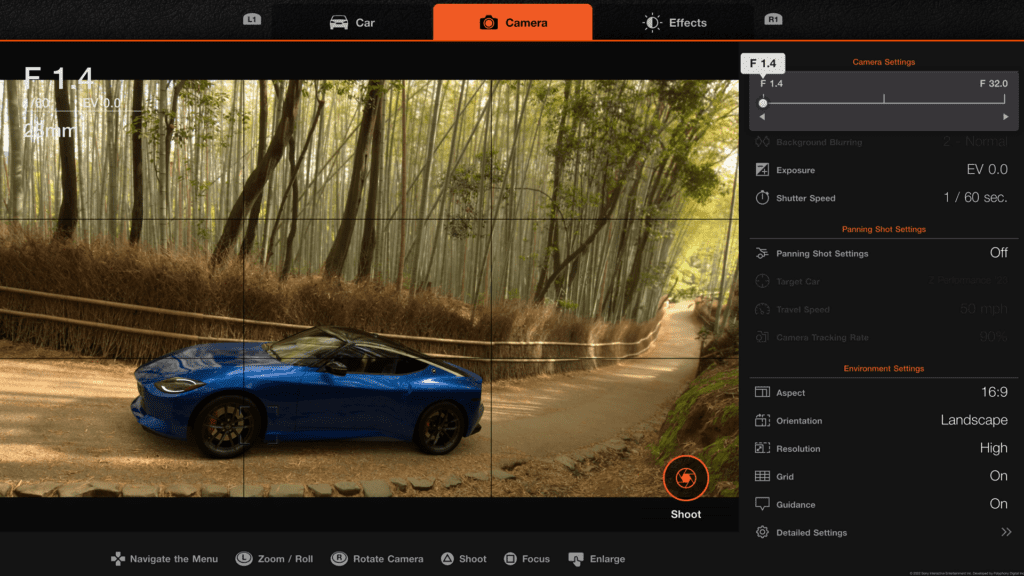
In the real world, lower f-stop settings are great for portraits, and higher settings are perfect for landscape photography.
For example, in very simple terms, f/1.4 will mean the background has a ‘blurry’ effect, while f/32.0 will not.
Thankfully, if you just want a quick image, set the Focus to ‘Full Auto’ and an easy-to-use ‘Background Blurring’ option will appear, allowing you to increase or decrease the amount of blur without having to re-focus the shot and tweak aperture.
Shutter Speed
A camera shutter controls how much light is allowed into the camera sensor. If the shutter is left open for a long time, more light is let in, and vice versa.
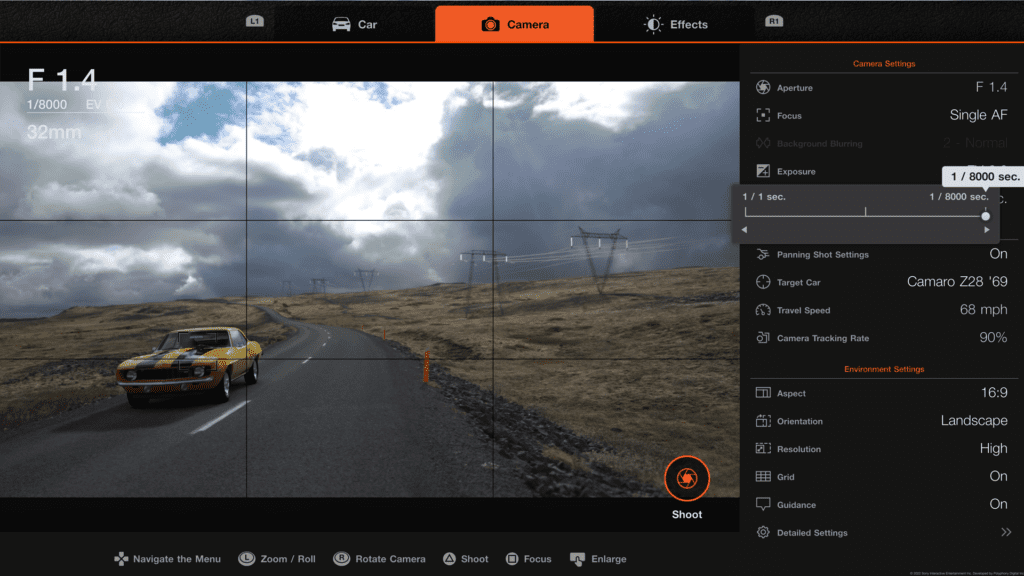
The Shutter Speed number is the length of time the shutter is left open for, so 1/100s is one one-hundredth of a second, and 1/1000s is one one-thousandth of a second. 1/100s is a bigger unit of time than 1/1000s, so will allow more light to pass to the camera sensor.
In real life, you’d balance Shutter Speed with Aperture to obtain the perfect overall exposure, but Gran Turismo 7 compensates for this automatically, making things much easier for players to capture awesome images.
As a final note on Shutter Speed, you’re limited to a minimum of 1/60s when taking photos in Race mode.
This setting is key to a nice ‘panning shot’ that heightens the send of speed. More on that, later.
Exposure Correction
Exposure is essentially the amount of light that hits the camera sensor. Because the game’s photo mode merely simulates real-life, the game compensates for lower light conditions, so you can get away with ramping up the F-stop numbers without accruing the negative effects of less light.
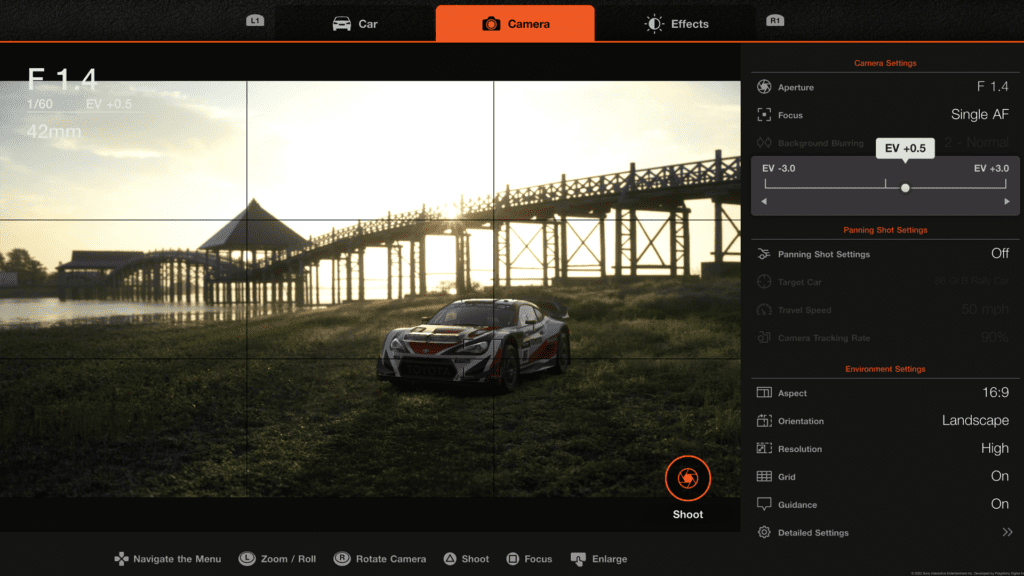
This means Exposure Correction is just a way of fine-tuning the brightness of the shot in the game. Therefore, for night or sunrise/sunset photos it can be helpful to add a little Exposure Correction so the shot isn’t too dark.
You can add Exposure Correction in real-life photography too, where it is much more important tin the Aperture/Shutter Speed balancing act.
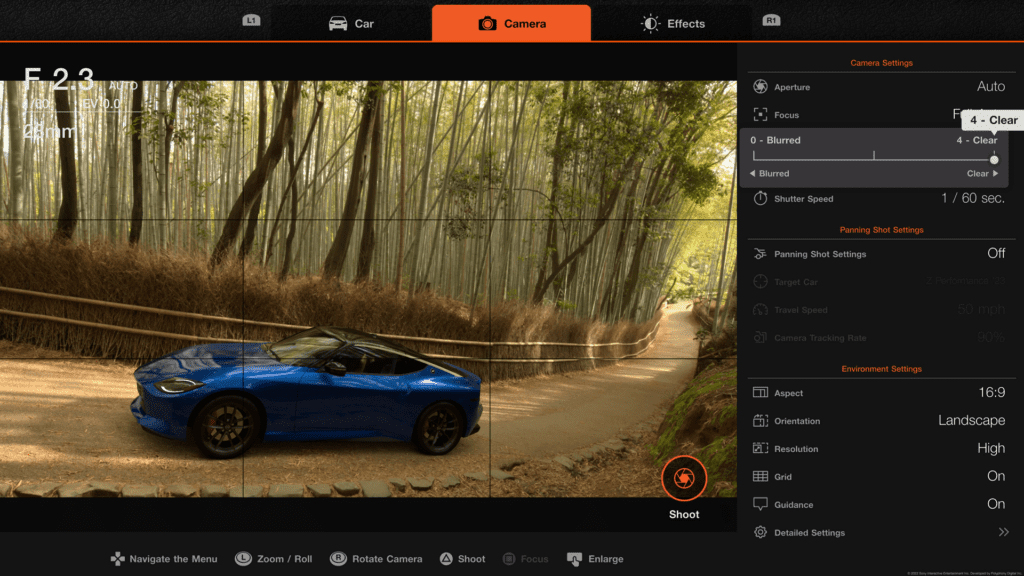
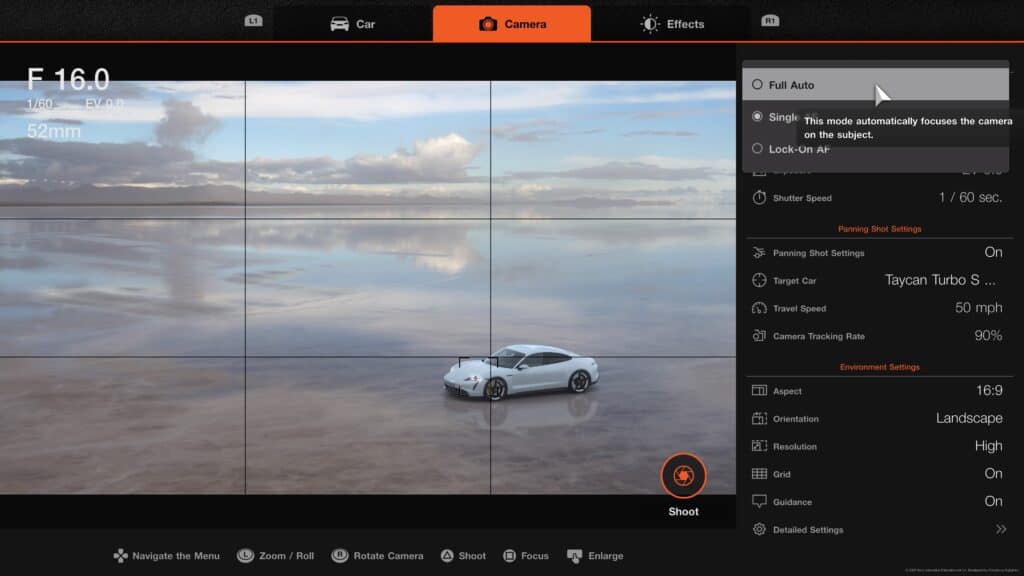
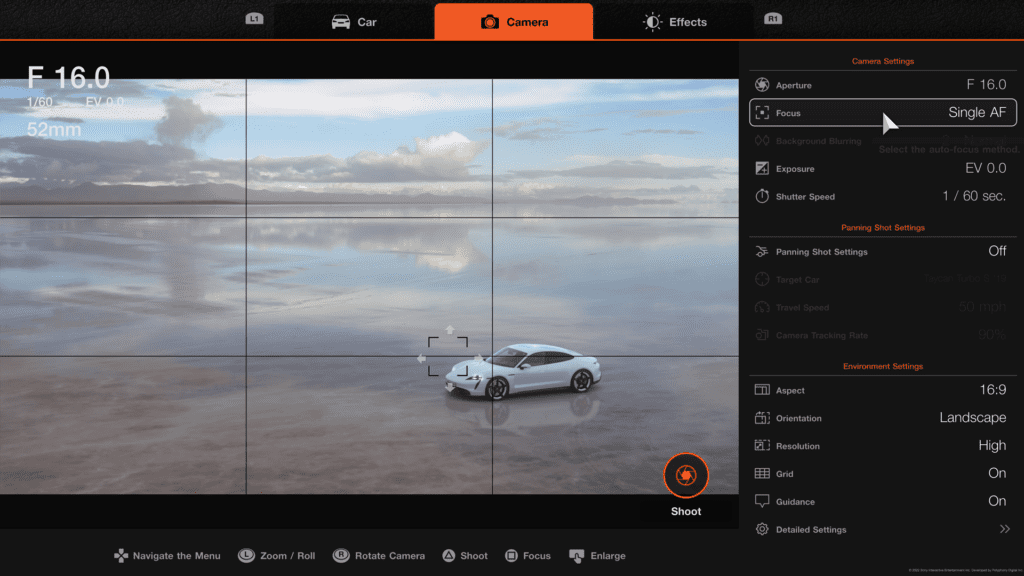
Focus
There are three types of focus to select: Full Auto, Single Auto Focus, (Single AF) and Lock-On Auto Focus (Lock-On AF).
Full Auto sets the Aperture and Focus automatically, meaning your photos will have the subject perfectly in focus but be slightly devoid of character as a result, since the Aperture almost always defaults to a high setting.
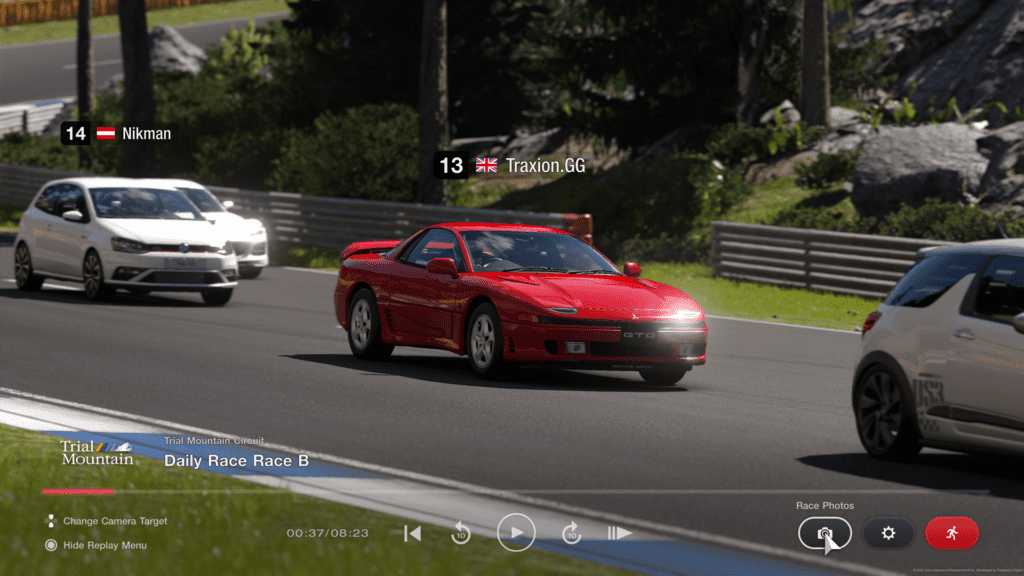
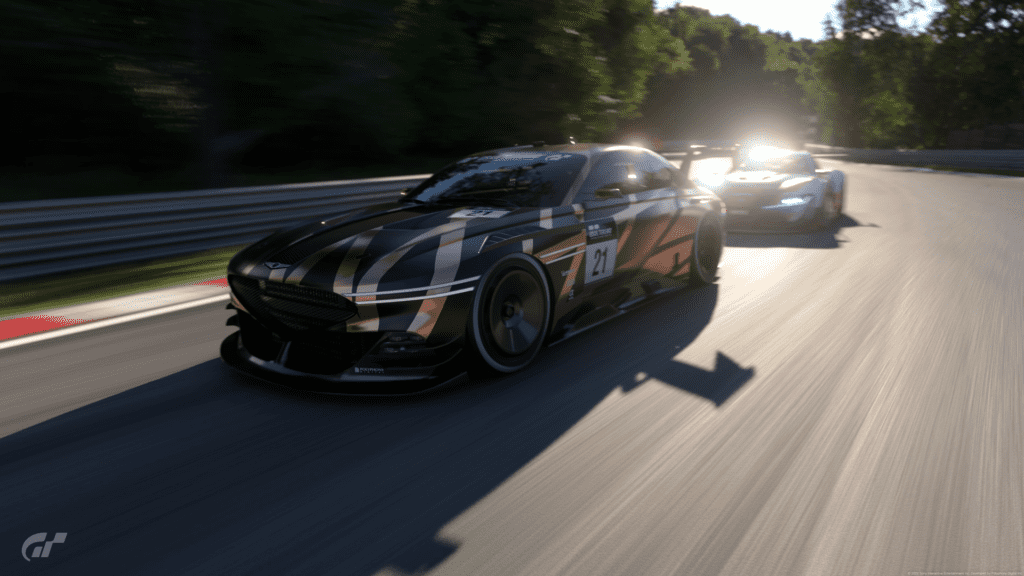
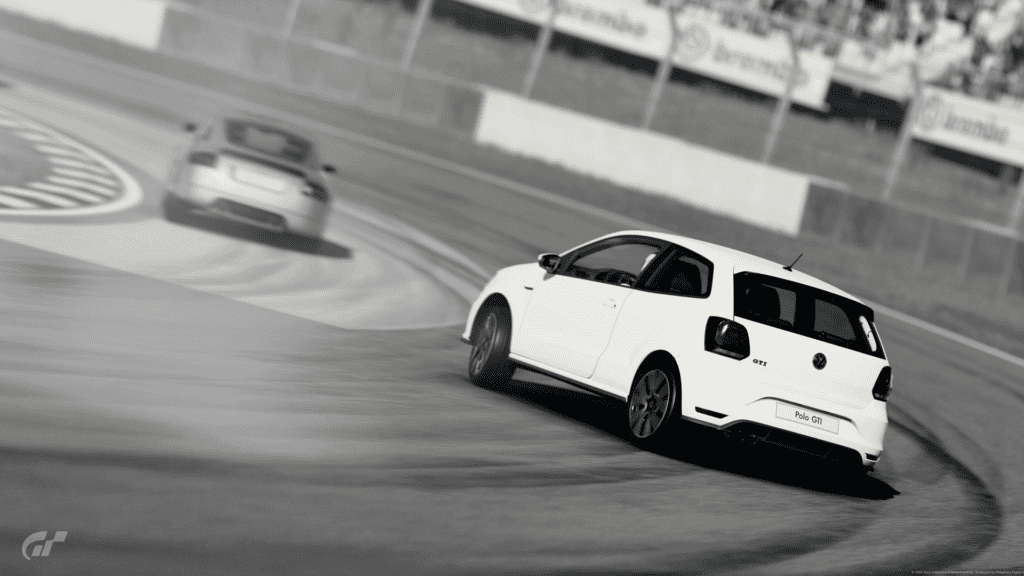
Single AF allows you to set a focus point on any part of the image by pressing and holding the Square button and then using the left analogue stick to move the point of focus. For example, on slower shutter speeds picking out a single focus point can create an eye-catching focal point on a panning shot.
This image shows how this looks when I’ve focused on the front of the car only.
Lock-On AF works the same way as Single AF, but you can move the camera around after setting focus without having to refocus.
How to use the Panning Shot Settings to achieve motion in an image
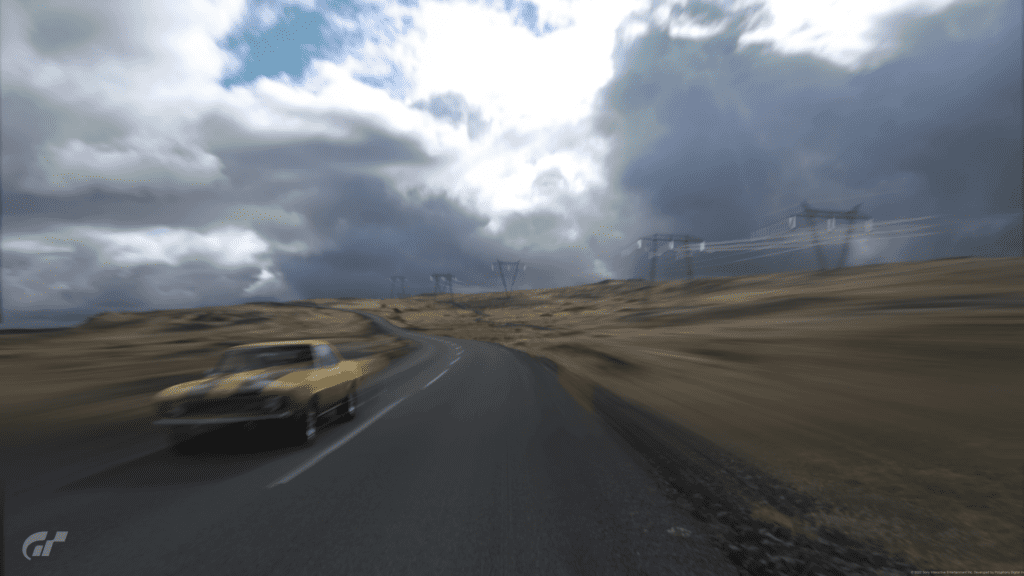
Panning, as briefly outlined in the Shutter Speed section above, is tracking a moving object using the viewfinder of your camera, continuing to do so as the shutter is released. This ensures the object in motion – your car – stays in focus while its wheels plus background and foreground appear to have a motion blur effect.
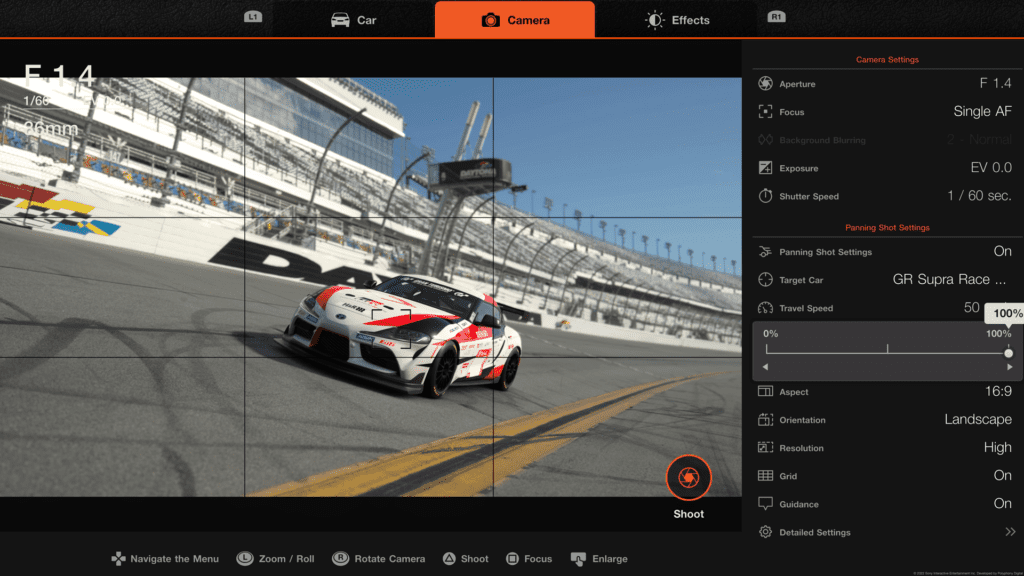
There are different Panning Shot Settings available in Scapes mode as opposed to race photos. Scapes has more pared-down panning settings available, in that the Camera Tracking Rate is the only setting to adjust, along with the target car.
Keeping the Camera Tracking Rate to 100% ensures the car stays in focus as much as possible.
Balancing the speed of the car with Shutter Speed is crucial to finding a sweet spot in terms of motion blur but increasing the speed of the car can result in a greater amount of background and foreground motion blur.
Keeping the Camera Tracking Rate at 100% will show the target car in the most detail but will give it an unrealistically sharp appearance. In my opinion, settings around 80-90% ensure the target car is in focus but provides a more natural panning photo look.
Let’s face it, real motorsport panning photography will always contain slight imperfections, so it’s nice to be able to replicate this in the game.
The easiest way to achieve a stunning panning shot is by watching a driving replay of any kind, visiting the photo mode, making sure the Panning Mode is set to ‘Mode 2’, focus on your car and the setting shutting speed all the way to the left (1/60 Sec). Et voilà!
We’ll have more on the Panning Modes during a replay later on.
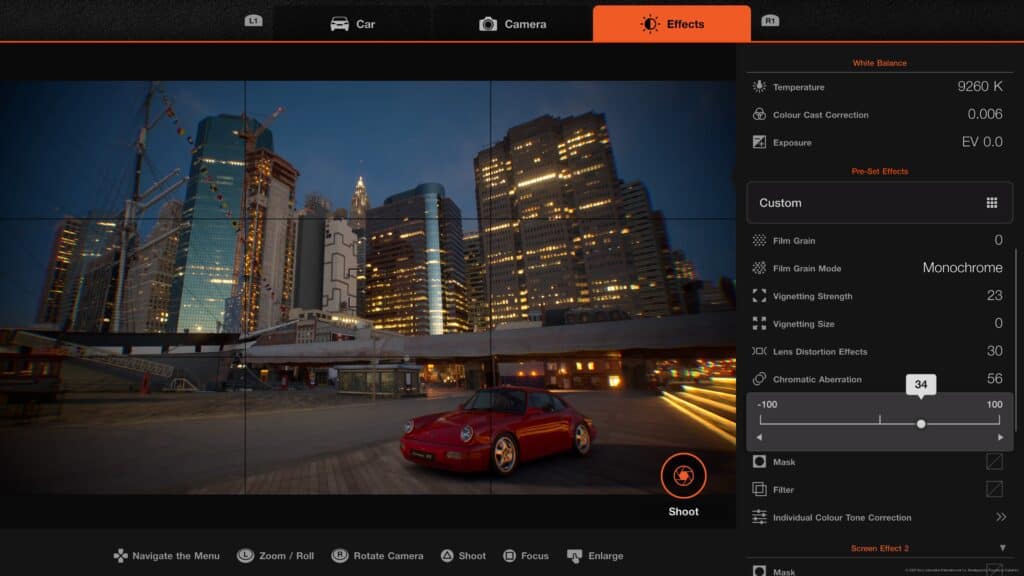
Effects
GT7’s photo mode features a range of post-processing effects and screen filters. From adjusting the warmth of the image to adding a vignette, there are a number of optional steps to take to fine-tune your image.
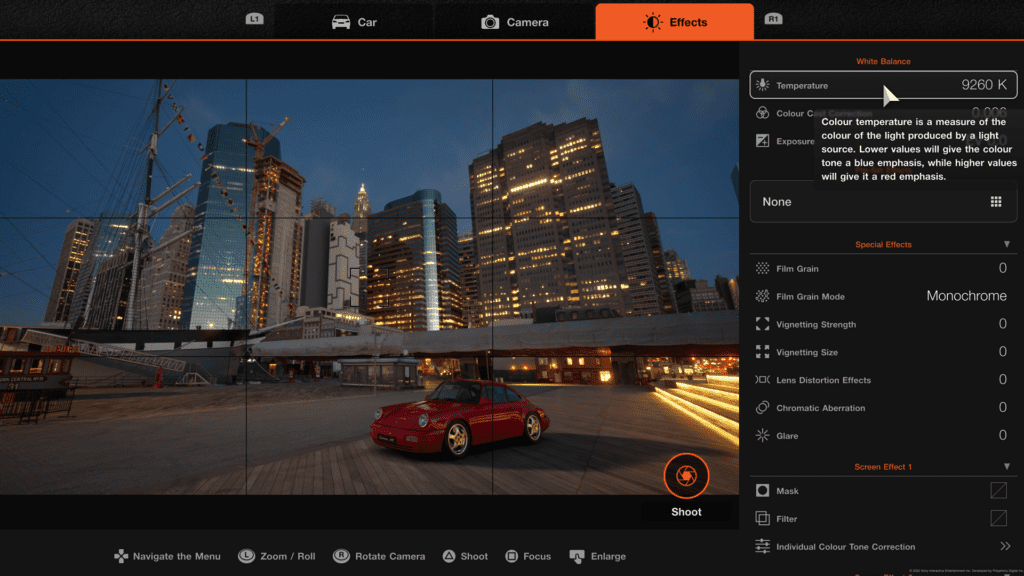
White Balance
In this sub-menu, you can adjust the tone of the photo, the Exposure Correction (again) and change the temperature of the image.
Temperature is measured in Kelvins and refers to the Kelvin Scale for temperature. Around 4000-7000K represents daylight – from sunrise/sunset to overcast – so unless you want your photo overly blue or cyan tinged keep it within these parameters.
Colour Cast Correction refers to the overall tone of the image. Higher numbers equate to adding a warmer tone, while lower numbers provide a cooler appearance.
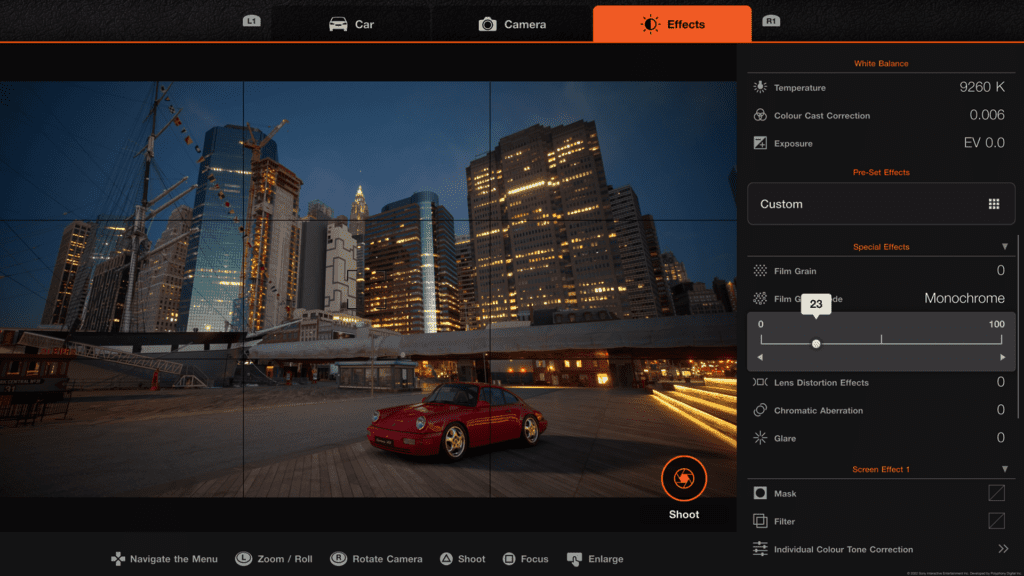
Special Effects
Film Grain
The Film Grain setting adds noise to the image, in colour or monochrome. Imitating static seen on old analogue TVs, or the effect of multiple re-recordings on an old VHS tape, there’s limited uses for this effect, but with the right car and Scape it is possible to create an interesting shot.

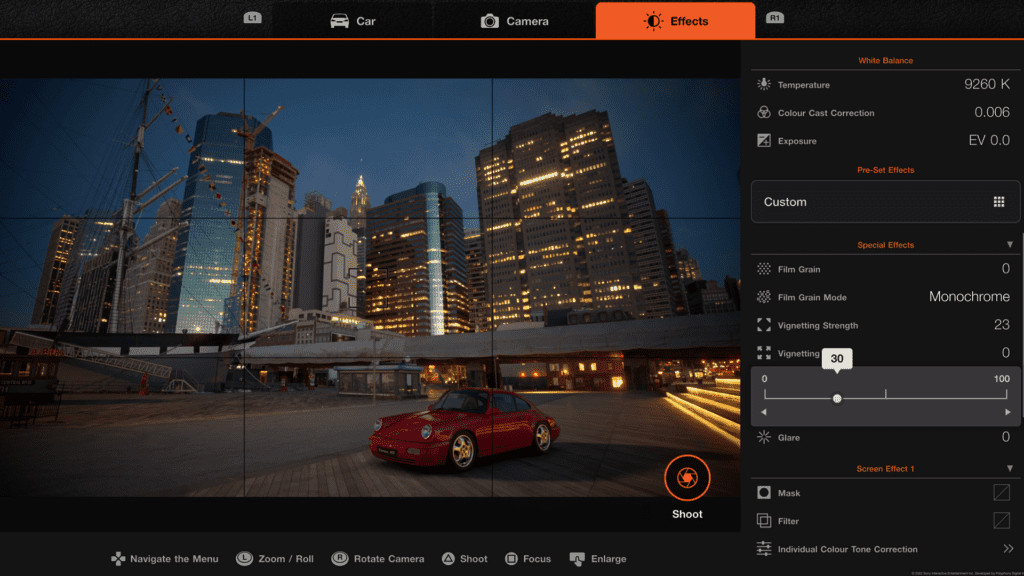
Vignetting
Adding a modest Vignette darkens the edges of the photo, drawing the eye to the subject in the middle, and is extremely useful in adding a professional look to your shots. Setting the Vignetting Strength to 20-30 offers a nice balance without overpowering the image.
Lens Distortion Effects
This setting adds a warp effect to the shot, imitating the barrel distortion sometimes found in wide-angle prime lenses.
Normally photographers would not want visible lens distortion in their images, but again it highlights Kazunori Yamauchi’s determination to include realistic photography aspects. The effect itself is attractive in practice, and well worth experimenting with.
Chromatic Aberration
Gran Turismo 7’s photo mode simulates a real-life photography issue called Chromatic Aberration (CA). CA, also known as colour fringing, is when light is bent by the lens of a camera in such a way that all colours (light waves) arrive in front or behind the focal plane.
This leads to hazy effects in your photos that sometimes remind me of looking at old school 3d pictures without red and blue glasses.
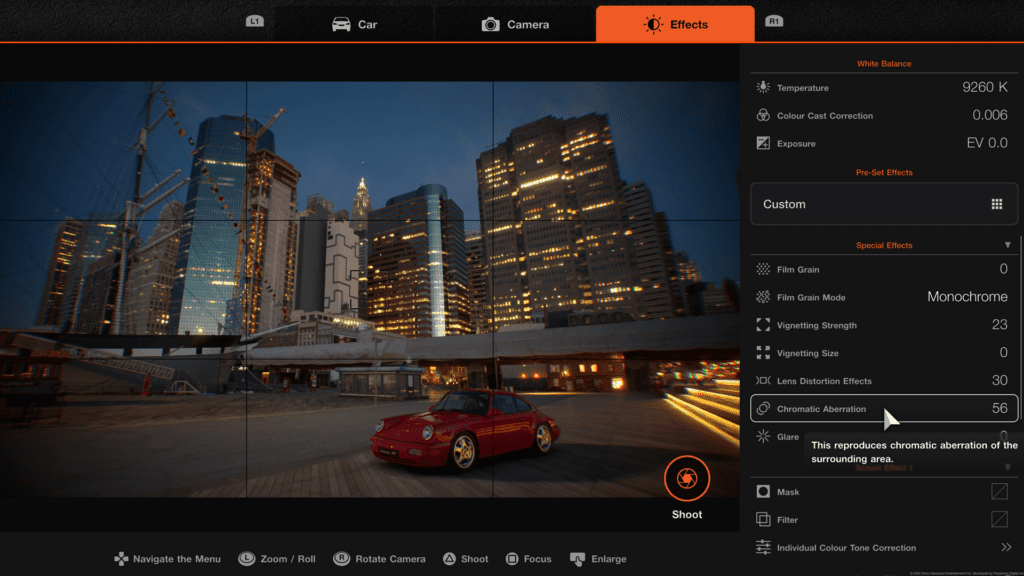
So, quite an unpleasant feature in the real world, and synonymous with lower-quality lenses, so why would you want to use it in tis game? Quite simply, it provides an extra dimension of realism, and in the right circumstances add another layer of believability.
CA normally affects the outer edges of a photo in real life, and this is mirrored in-game. Increasing or decreasing the effect creates a hazy effect around your main subject, drawing the eye to the centre of the frame. I’d advise that this effect should only be used if the subject is centred on your virtual canvas.
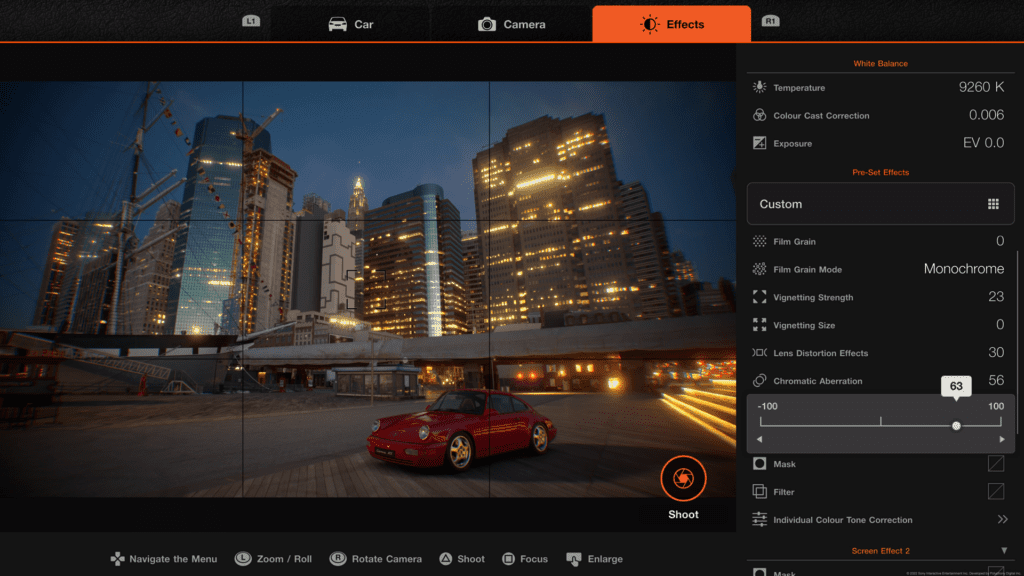
Positive and negative values alter red and blue light waves in Gran Turismo 7, increasing warmth or coolness respectively at the edge of your photos. The slightly distorted-looking effect works fairly well, but if you’re trying to take a clean shot of your subject it seems counter-intuitive to simulate a cheap camera lens’s defect.
Glare
This simply adjusts the strength of glare from any light source within the image, including headlights or streetlights. Higher numbers create a brighter effect.
Screen and Car/Driver Effects
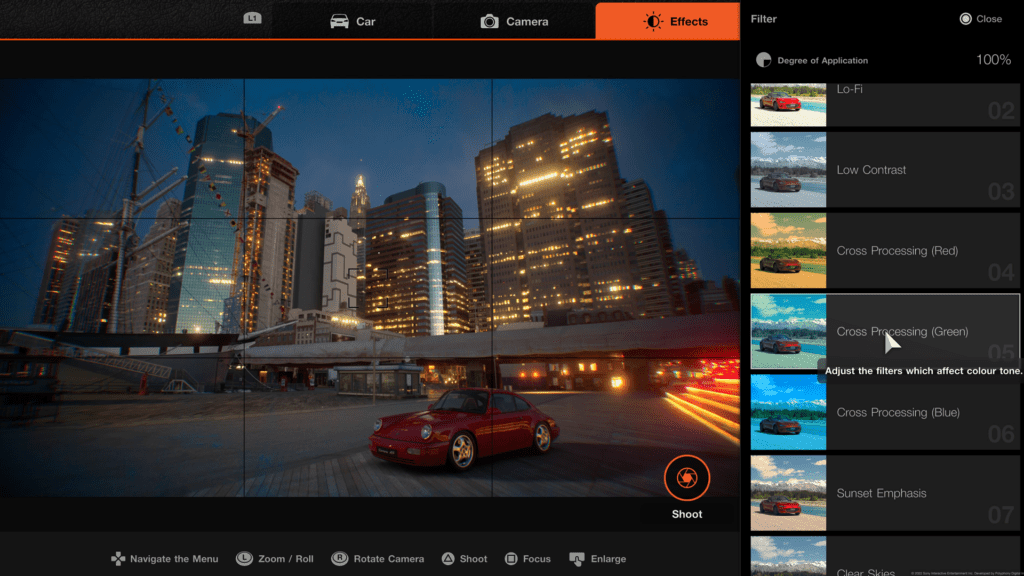
The final set of effects adds Instagram-style filters to your images via layer masks. In real photography, creating layer masks to edit your photos is a time-consuming process, but fortunately, the photo mode lets you apply filters and adjust their individual profiles via Saturation, Brightness, Contrast and Highlights sliders, including an overall Degree of Application setting.
The game allows you to set two background masks with their own filters, and one already-masked car filter.
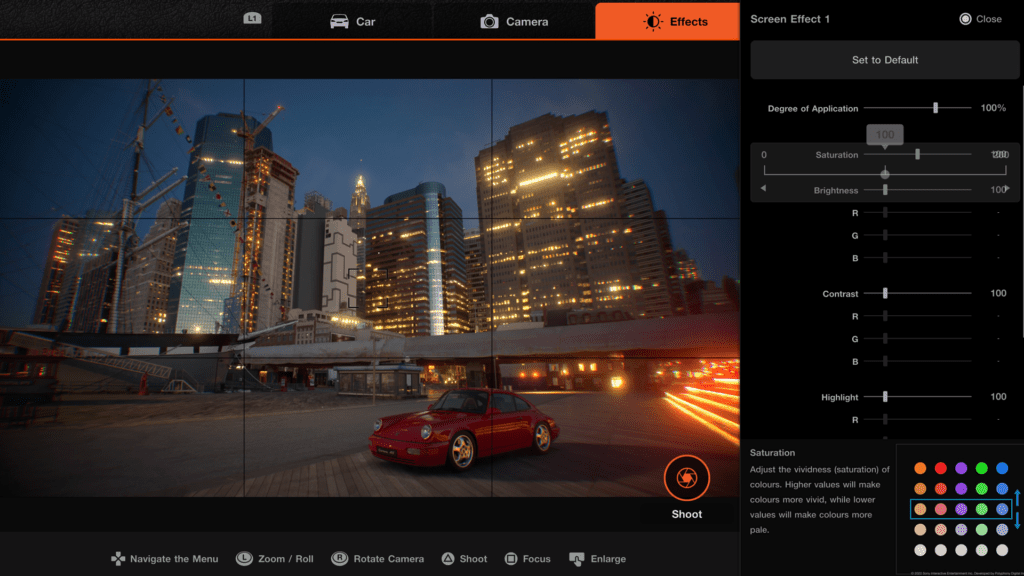
You can set different masks for the top and bottom of a photo, producing a classic Top Gear style moody landscape shot like the one below. Note the sky and how it imitates a graded camera filter, while the bottom of the photo – where the car is – stands out by using a brighter alternative option.
If you want to avoid adjusting too many settings manually, you can simply choose from a list of Effect Presets already present in the game. As ever, experimentation is key to finding what works for you – there are no right or wrong answers!
Differences between Scapes photography and Race Photo modes
The biggest difference between taking a Scapes photo and a race photo is you have to pause a replay at the moment where you want to take a photo. So rather than moving the car into your desired position like in a Scapes photo, you are bound by wherever the target car has driven during the recorded race.
When the replay is paused by pressing Start, scroll to the right and select Race Photos. Here, you can choose from nine external cameras and a cockpit camera. Alternatively, you can select Walk Mode and move the camera around to your desired location using the analogue sticks.
This isn’t set in stone at this stage, you’ll still be able to adjust the view later. Press Cross to aim the camera and set up your photo.
Settings such as Aspect, Orientation, Grid and Resolution are self-explanatory, but handily GT7 provides pop-up tips and advice for those unsure on how to proceed.
Camera and Effect settings are virtually the same as they are in Scapes mode, with the big difference being the breadth of Panning Shot Settings.
There are three panning methods to select in GT7’s Race Photo mode. Mode 1: Fixed Camera, Mode 2: Moving Camera and Mode 3: Moving and Rotating Camera. At slower shutter speeds, selecting the correct panning mode is important, otherwise, your finished image will be blurry.
As the name suggests, the Fixed Camera is fixed in a single position. This closely mimics real-life motorsport photography, in that the photographer stands and points their camera at a moving car, tracking its movement by pivoting from a fixed position.
Already mentioned earlier, during races, shutter speed is limited to 1/60s, while in Scapes this increases to 1/1s, enabling some extreme long-exposure blur effects.
When using very low shutter speeds, remember to adjust the speed of the car accordingly – keeping it to under 5 mph will still provide a lot of motion blur.
Think of the way car magazine photographers are able to take dynamic shots in the confines of a car park, where high-speed tracking is impossible – GT7 can simulate this.
The key to taking great photos in Gran Turismo 7
Taking the shot you want in Gran Turismo 7 is down to how you balance all the above settings. Shutter Speed and Aperture are by far the most important settings to get right and should form the basis of your shot. From there, you can add extra effects and filters to enhance the ‘flavour’ of your image.
The Panning Shot Settings can also make a big difference. Selecting the wrong mode can lead to a slow shutter shot looking like a blurry mess. After these have been locked down, adjust the other settings to your preference, making sure you’ve focused on the correct area!
Post Processing
If you’re a real-world amateur photographer you will already know how important utilities such as Photoshop and Lightroom are in creating an eye-catching photo. Fortunately, GT7 allows all players to download a 4K resolution jpeg of their photos from the GT7 website.
The best way to do this is to have the highest quality photo files to begin with. Unfortunately – on the PlayStation 4 version of GT7 at least – GT7’s captured images were locked to 1920×1080 resolution. With the v1.15 update, however, this has been bumped up to 4K.
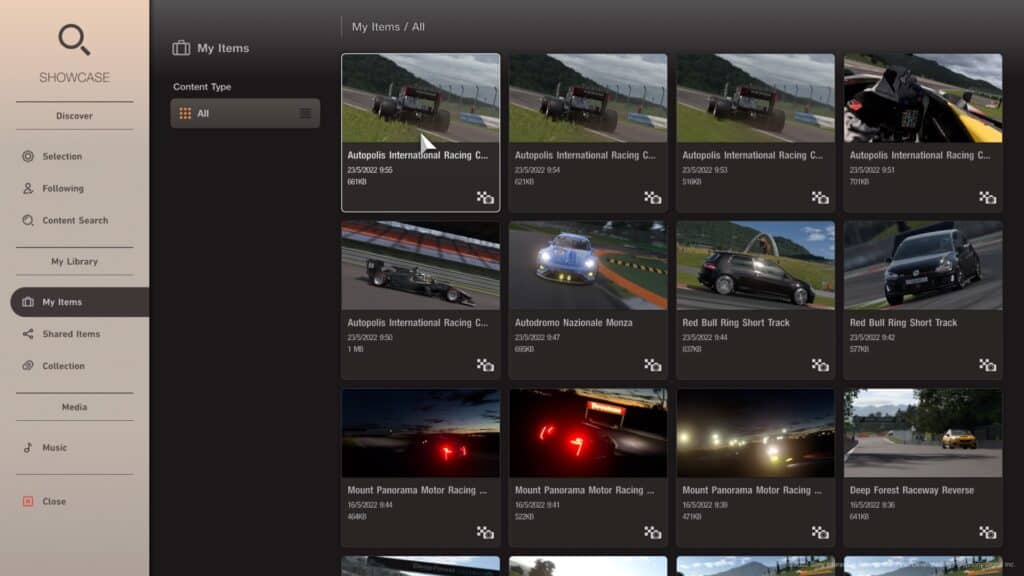
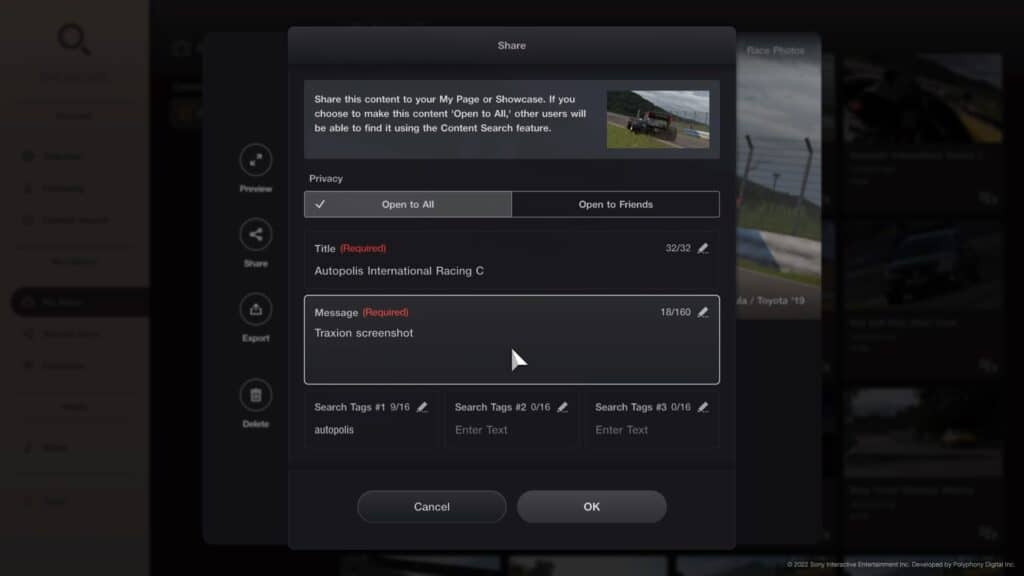
To upload your photos to the GT7 website, head to ‘Showcase’ on the World Map. From there, all your saved photos and replays will be in the ‘My Items’ menu. Select the photo you want to upload to the website by clicking ‘Share’ and you will be asked to fill out some photo information as per the screenshot below.
Hit ‘OK’ when done and a 4K image will be uploaded to ‘My Page’ on the GT7 website.
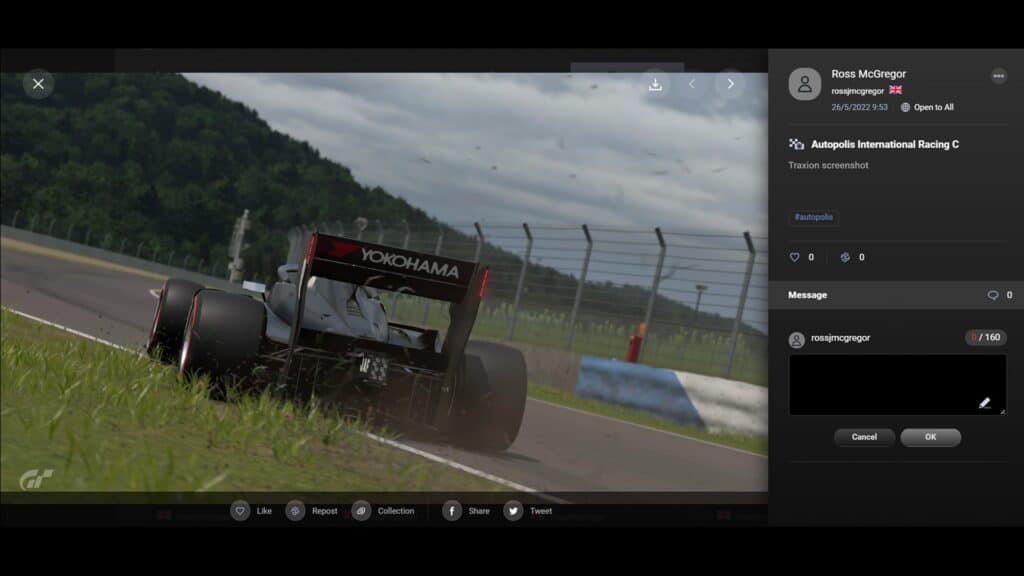
Scrolling to ‘My Page’ on the GT7 website will bring up a Gallery of all the photos you’ve taken in-game and uploaded. By clicking on the top right of your image you will now be able to download a full, 4K version of your photo.
This is a feature that benefits PS4 users mostly, since PS5 players can screenshot at 4K regardless, but uploading the core files directly takes away any chance of quality being compromised through compression.


Chat with the Community
Sign Up To CommentIt's completely Free