Assetto Corsa Competizione (ACC) is a fantastic-looking game with hyper-realistic graphics and sounds. After you’ve just pulled off an amazing last-gasp overtake to win the race or executed a perfect drift through Eau Rouge-Raidillon at 150mph, it’s only natural to head into replay mode and capture some of the action for posterity via the in-game screenshot tools.
There are a few caveats to this; at the moment the full extent of this mode is only available on the PC version of the game, and there are some functionality issues with one or two settings, but it’s still possible to capture dynamic and realistic images that can deceive the viewer into thinking they’re watching real racing.
As an amateur motorsport photographer, I find screenshot and photo modes in motorsport games intriguing, and some games do it much better than others, so I wondered if I could also re-create some of my real-life photographs in ACC?
GRAPHICS SETTINGS
To be clear, we’re looking at the PC version of Assetto Corsa Competizione for this guide.
Firstly, to achieve the best quality screenshots in ACC, you need to ensure you are using the correct graphics settings. Below is an example of the settings that work well for me.
Aiming for the resolution scale at 200% will produce the best detail, but is resource-intensive, causing frame drops on lower-powered PCs. Try to keep this as high as possible, and aim for as many ‘Epic’ settings as possible.
Some settings such as white balance, tone mapping, exposure gain, sharpness, camera dirt effect and image contrast are open to interpretation and down to user preference, so it’s best to experiment with what you think looks cool! (And taking photos of any racecars is definitely cool.) I’d suggest saving the following as a custom video preset solely for screenshots, as it’ll affect the frame rate greatly during a race.
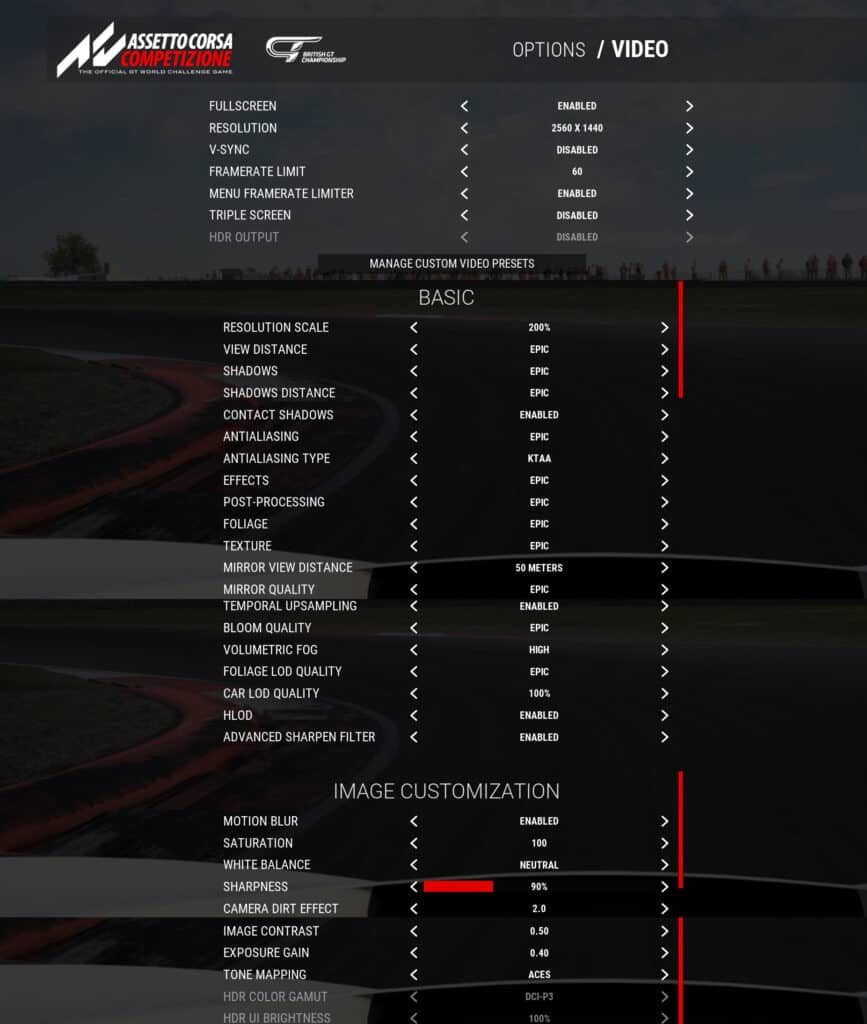
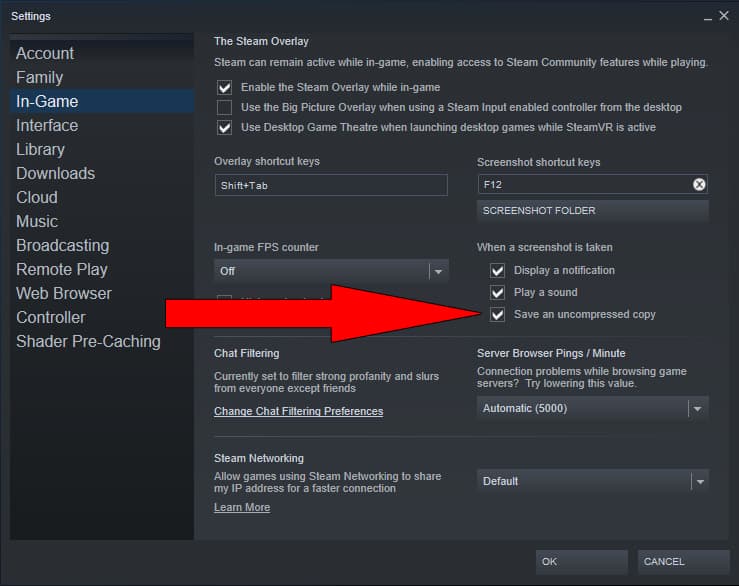
Another tip to achieve the best quality screenshot file is to enter Steam, head to ‘Settings’, then ‘In-Game’, and check the box that says ‘Save an uncompressed copy’.
ON TRACK
So, now all the preparatory work has been done, it’s time to get out on track and grab some screenshots!
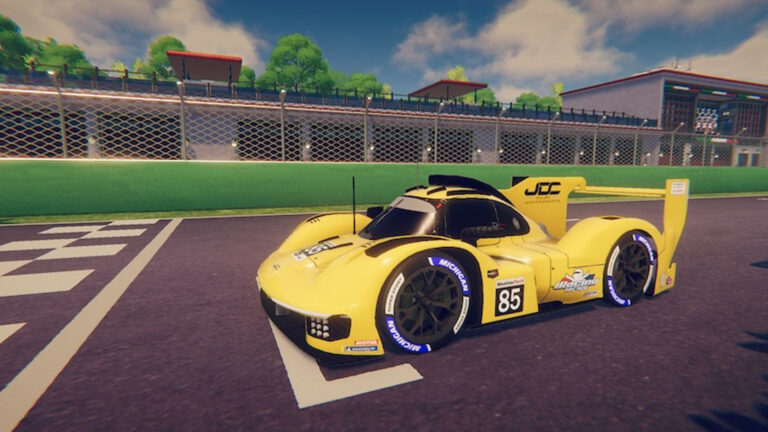
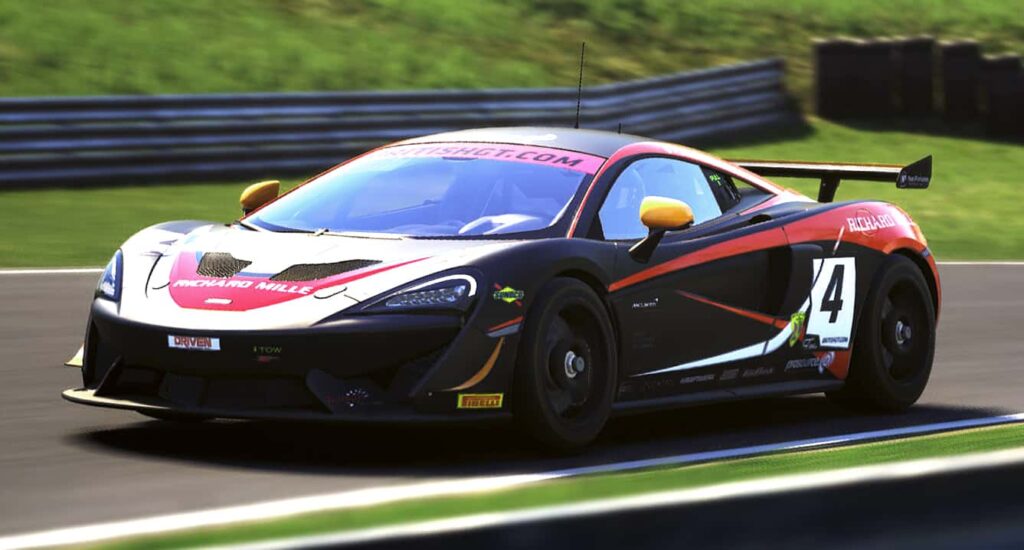
For this example, I’ve picked Snetterton, one of the newly-released British GT DLC tracks – which also includes Oulton Park and Donington Park. I’m driving the McLaren 720S GT3 as driven by Jenson Button & Chris Buncombe in the Silverstone round of the 2020 British GT season. I’ve set the weather to clear and the time of day to 6 am, so I can take advantage of the atmospheric Norfolk sunrise.
The next step is to take the car out on track for a few laps, save the replay, then watch it back to decide on some interesting screenshot angles.
CONTROLS & DEPTH OF FIELD SETTINGS
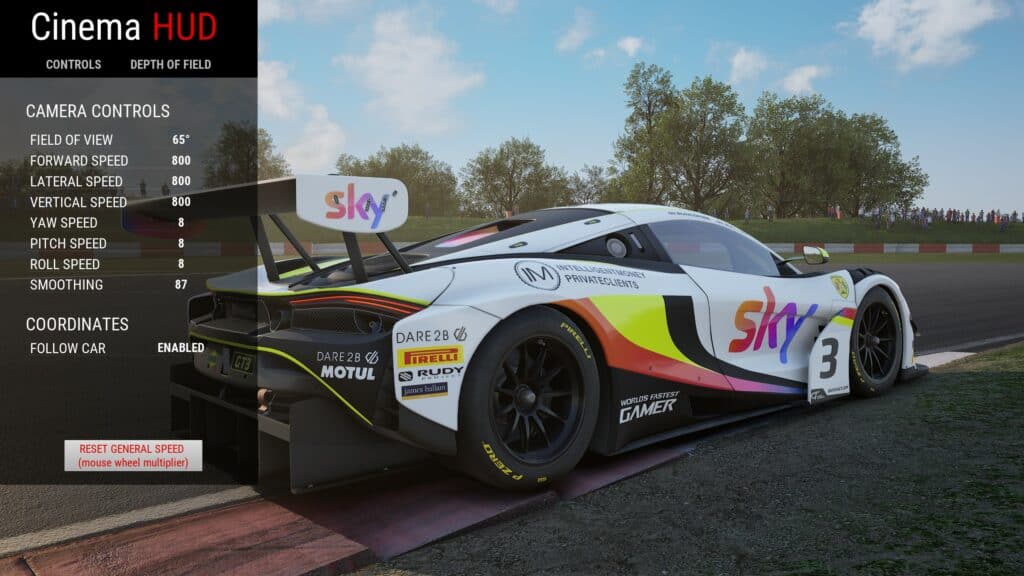
In ACC, you have a number of camera views to choose from, however, using the free-cam gives you the most control. Hitting ‘F7’ during the replay allows full control of the camera; the arrow keys move forwards, backwards, left and right, and holding the right mouse button while moving will adjust your view.
Clicking the mouse scroll button brings up the ‘Cinema HUD’, where settings such as ‘field of view’ (FOV) are available under the ‘Controls’ tab, and various other settings can be edited under the ‘Depth of Field’ tab.
Below, I’ve manoeuvred the free camera to an angle I like with a field of view at 65 degrees, and can now think about changing some ‘Depth of Field’ settings to get a more realistic and attractive image. Lower values of FOV simulate a real-life telephoto lens; higher values are the equivalent of a wide-angle ‘fish-eye’ lens.
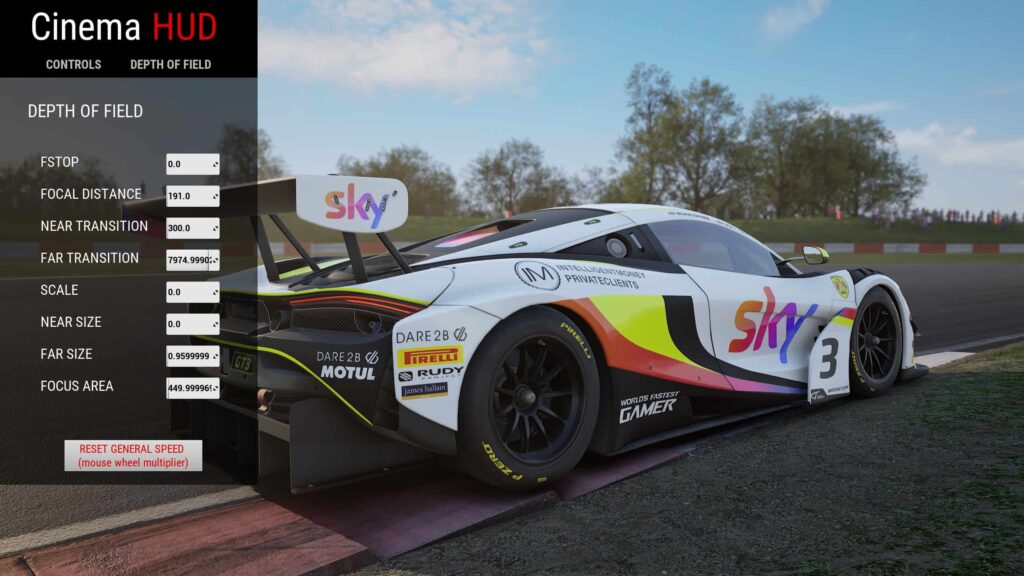
My first change is to the ‘Far size’ setting, going from 0 to 0.9599999. As you can see, this has blurred the background a little. You’ll also notice I’ve changed the ‘F-Stop’ value but nothing has changed. This is unfortunately a feature yet to be implemented in ACC.
The next changes I made were to alter the ‘focus area’ and ‘far transition’ settings. This has made the background blur effect look a little more natural. There is no hard and fast rule for altering the ‘Depth of Field’ settings, and I feel that the photo mode can definitely be improved upon in future ACC updates to make it more user-friendly.
It’s mostly a case of adjusting the sliders with your mouse (or manually type the numeric values) until you find suitable settings that work for you. For example, in this screenshot adjusting the ‘near size’ and ‘near transition’ values did nothing to the image!

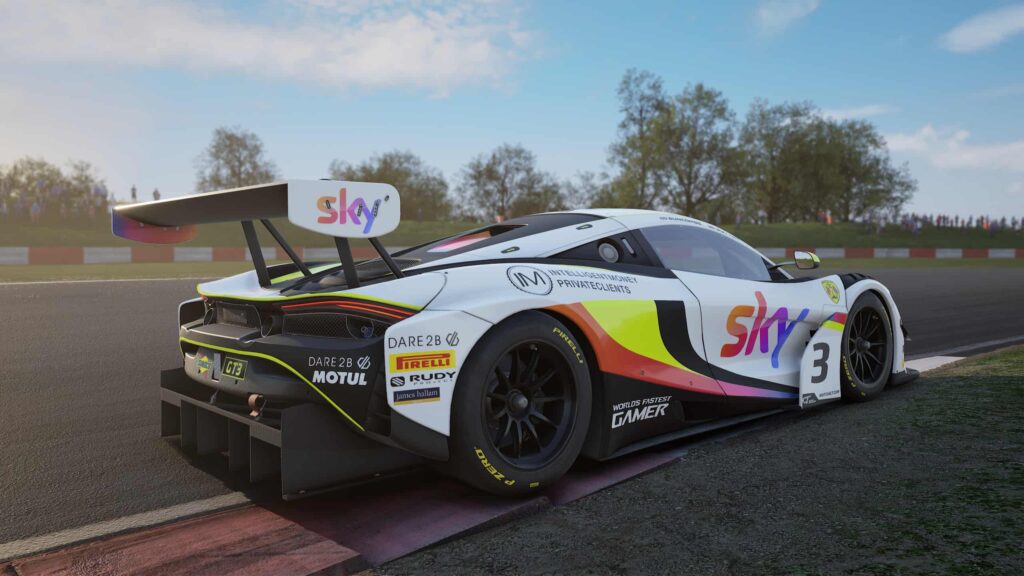
The final static image looks like this. For best results, it’s better to use the default Steam screenshot key F12 to capture. The in-game screenshot key is F8, but you’ll miss out on some post-effects, which brings me to…
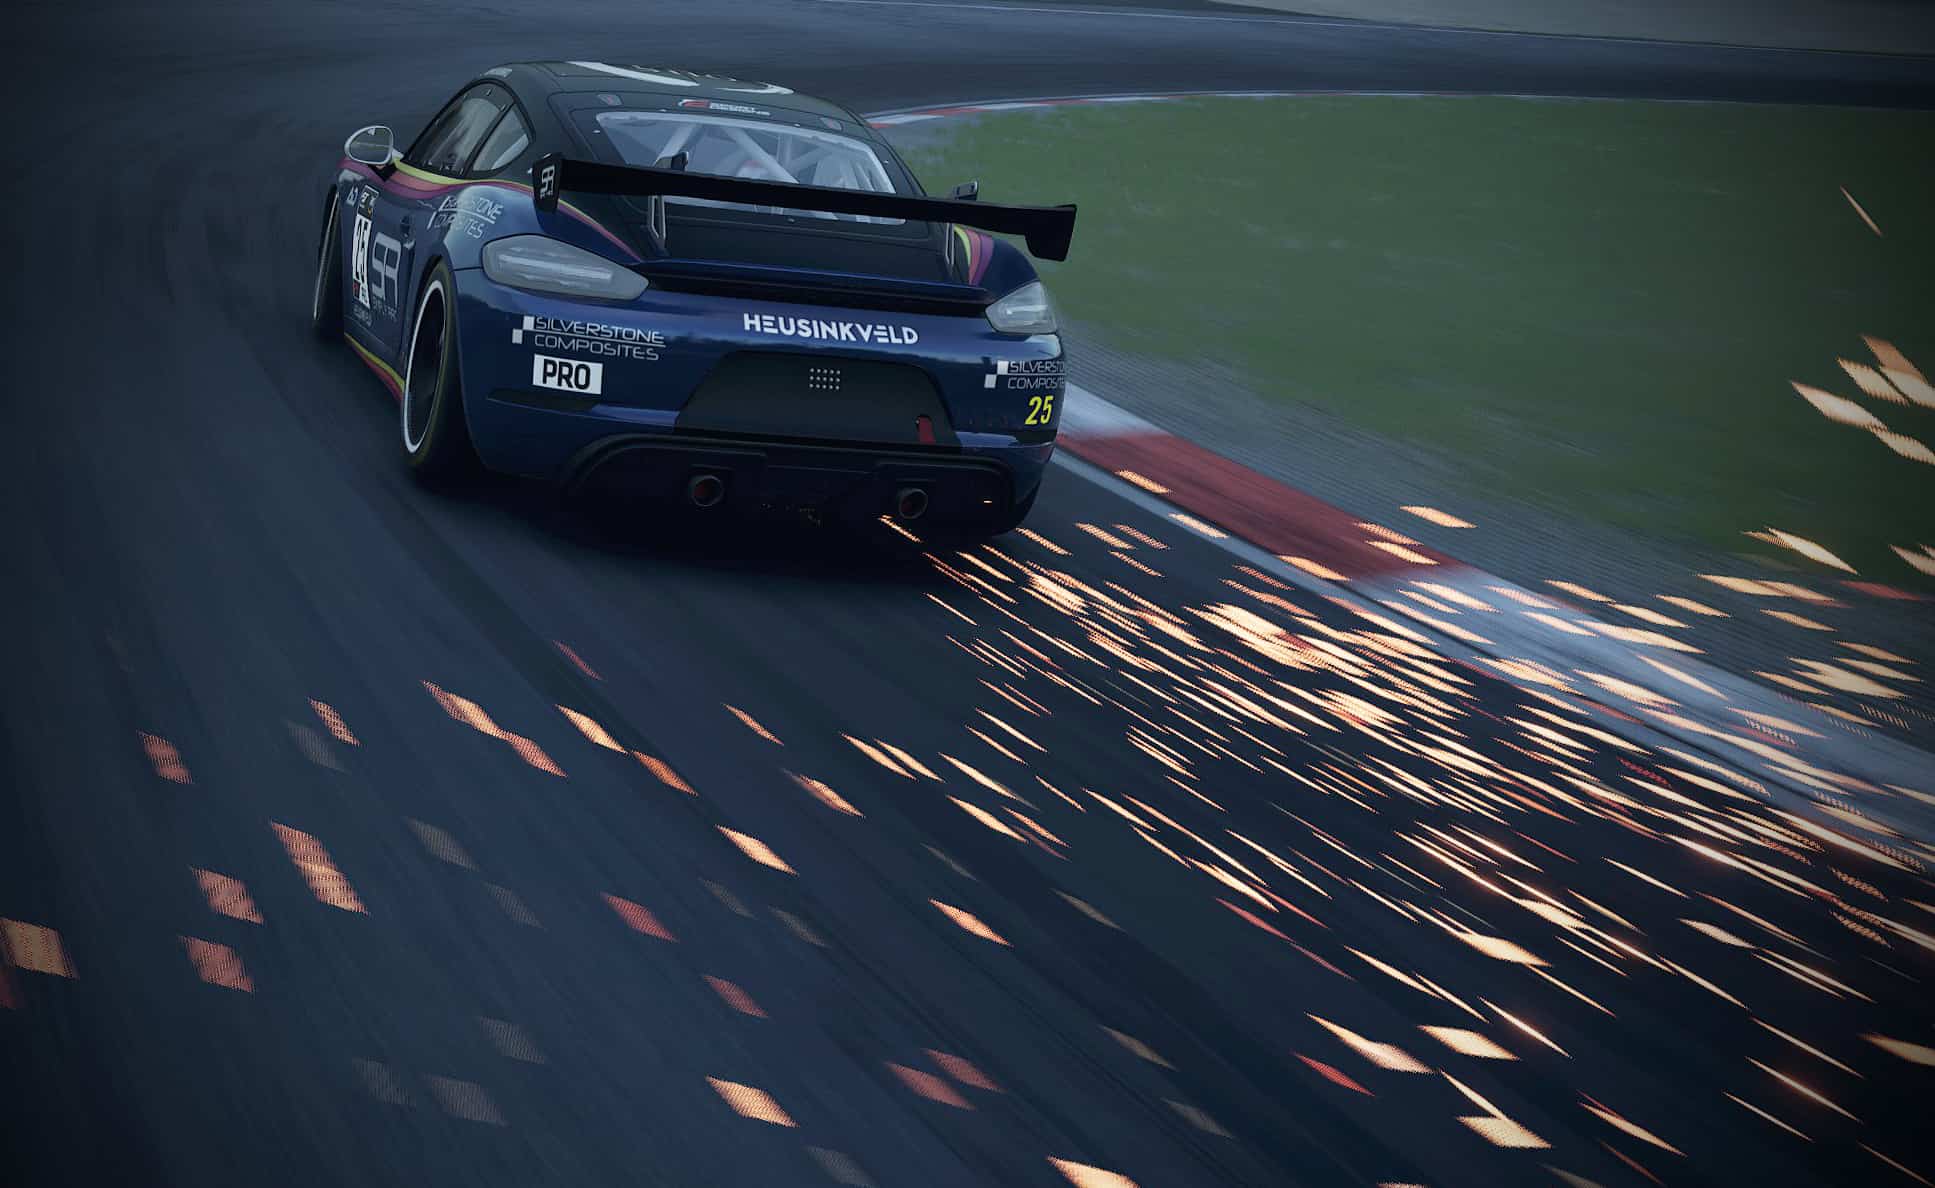
MOTION BLUR
It looks ok, but ACC has a final trick up its sleeve – motion blur! To get this effect you will have to play the replay and press the F12 capture key while the car is in motion. Normally I rewind the replay for 5 or 10 seconds, let it play, then make sure I’m quick on the draw to hit F12 at the correct moment.
This takes a bit of practice and patience, and is perhaps another aspect of the process that developer KUNOS-Simulazioni can improve upon in future. The impressive results of motion blur can be seen below, replete with sparks from a kerb strike!
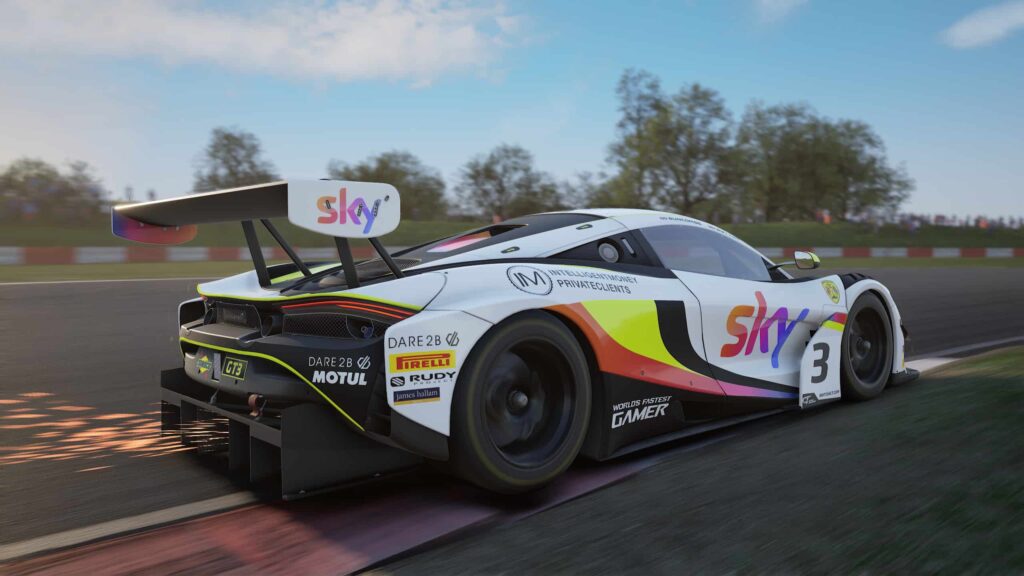
I’m sure you’ll agree that for an in-game screenshot this looks impressive, and really highlights the beauty of ACC. This image only took five minutes to produce and has had no additional post-production or photoshopping.
As a photographer, I’d normally always edit my photos further and adjust the curves, exposure and cropping amongst other changes, and the same goes for screenshots. It’s not always necessary as ACC produces high-quality images without additional software, but just to demonstrate I’ve quickly edited the above screenshot to look a little more attractive.
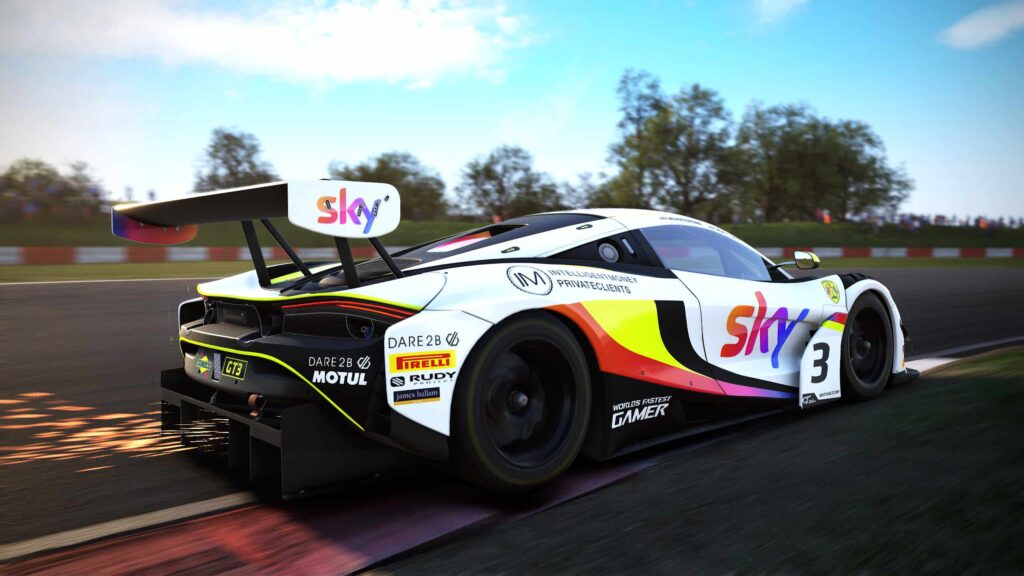
Makes quite a difference, doesn’t it?! I slightly adjusted the curves, exposure and added a slight vignette. It took less than two minutes and really makes the image stand out and look more dynamic.
As an amateur motorsport photographer, I have to say that the photo mode in a title such as GT Sport is more intuitive and user-friendly than ACC’s. The settings in ACC are poorly-explained and feel a bit hit and miss in terms of getting good results, with a lack of consistent feedback on which settings work.
However, in GT Sport, settings a real photographer would understand – such as shutter speed and F-stop – are properly implemented and can produce excellent results very quickly. But in ACC, F-Stop is a dead function and has been since the inception of ‘photo mode’.
In future, I hope Kunos move towards a GT Sport style system, but I cannot deny that even in its current state, ACC produces some excellent images that are hugely enjoyable to create.
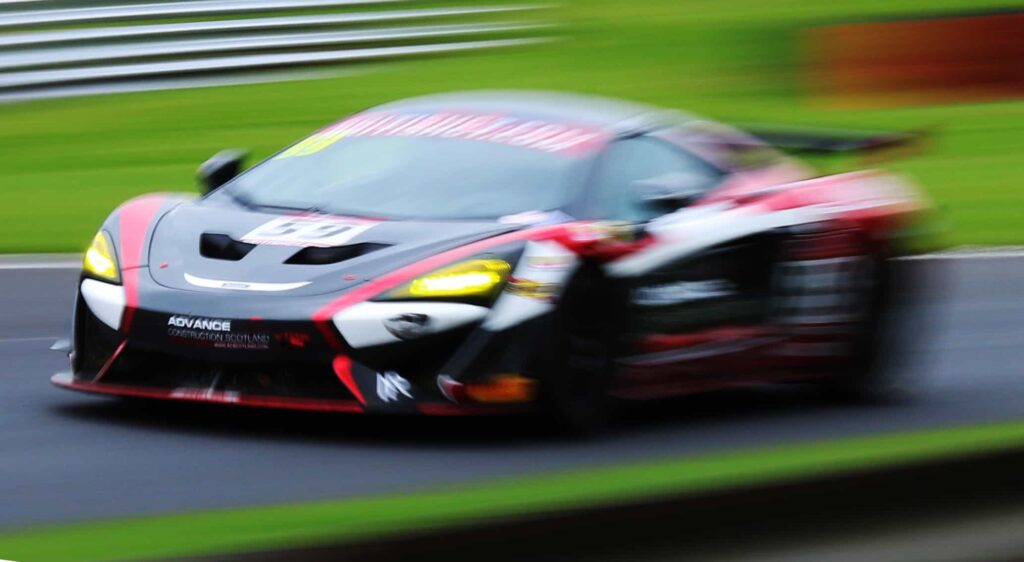
REAL VS ACC; HOW CLOSE CAN I GET?
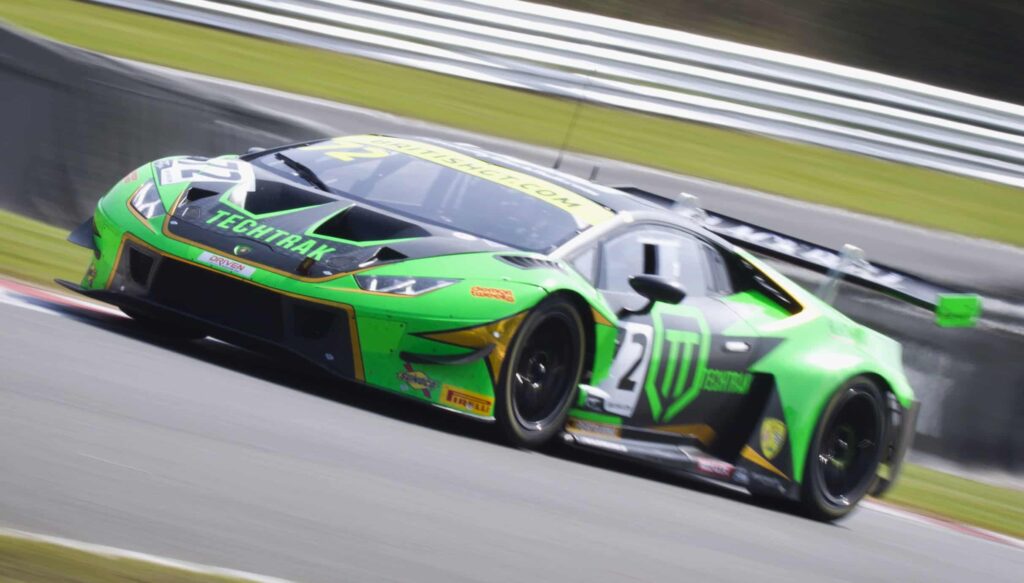
Finally, as an exercise to find out how realistic the screenshot mode in ACC is, I decided to try and re-create some of my real-life British GT Championship photos in-game. How close could I get?
Real life
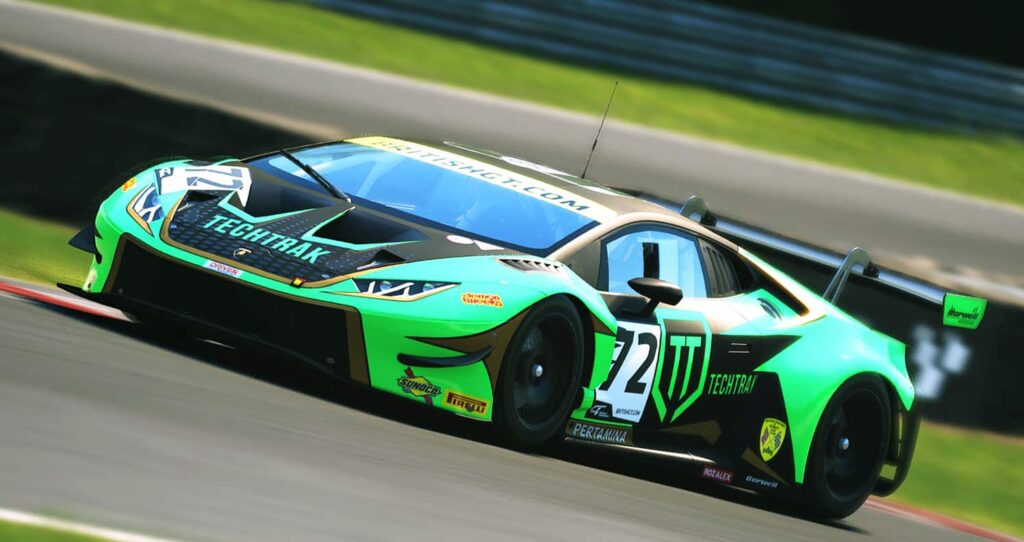
ACC
Real life

ACC
Real life
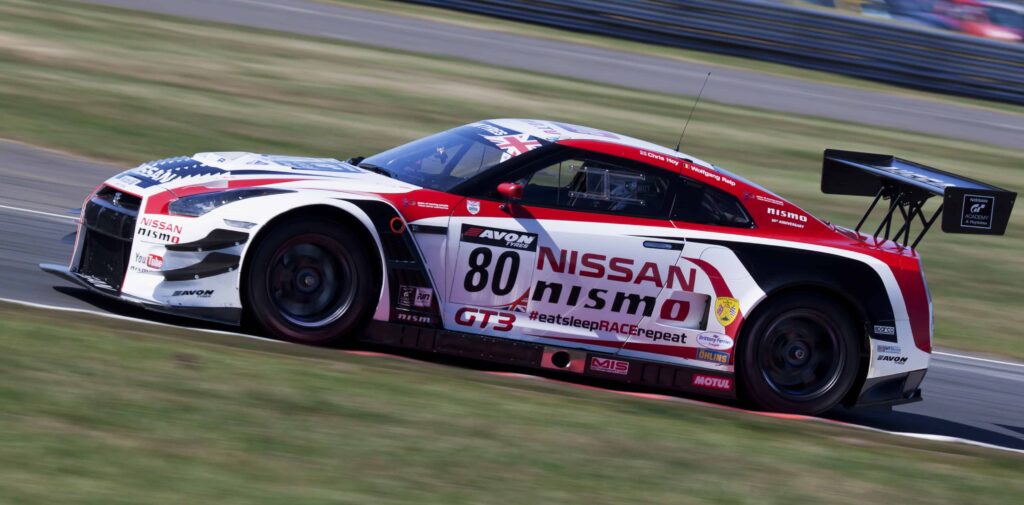
ACC
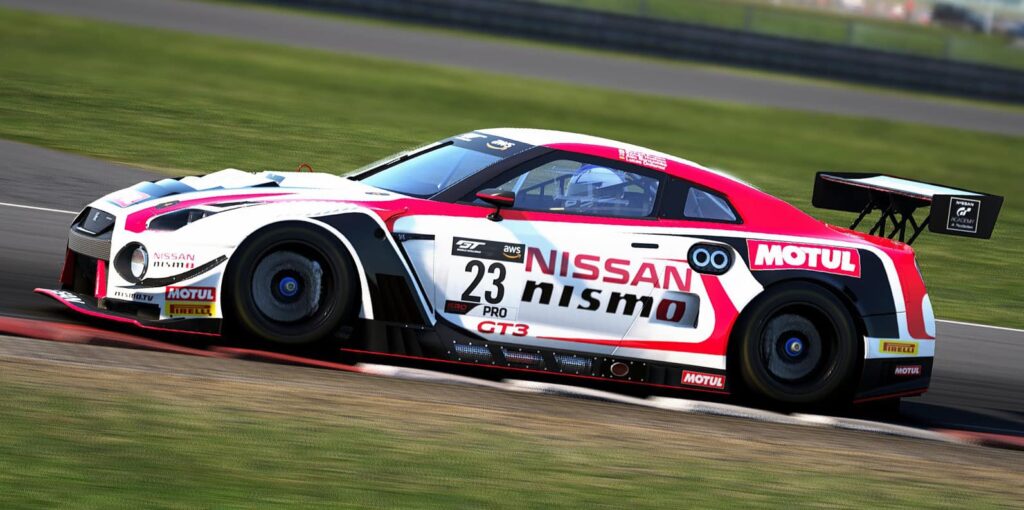
Real life

ACC
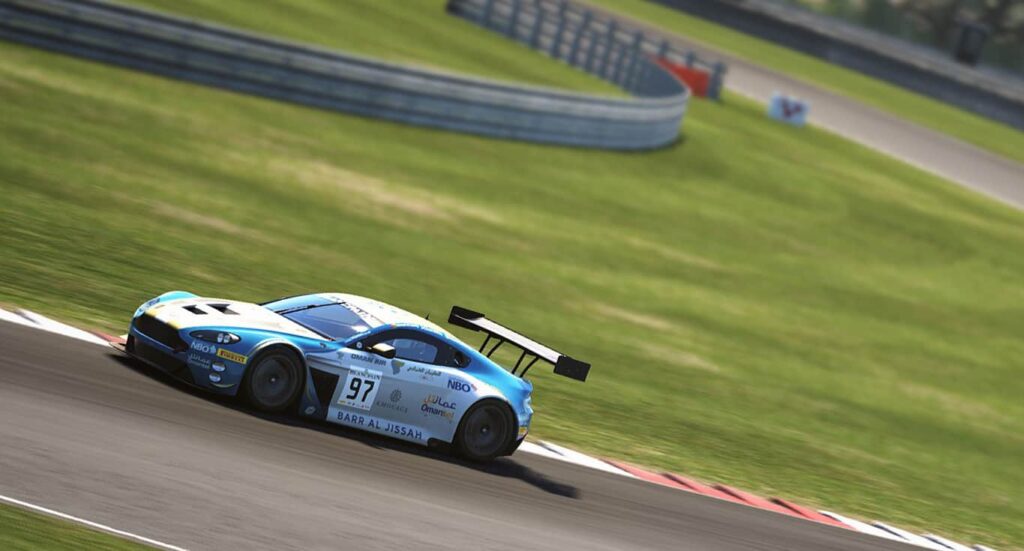
As you can see, it’s possible to recreate lifelike images, and with a little post-processing and editing even closer results can be achieved. The accuracy of the track models goes some way to helping replicate my photos, as I can place the camera in the exact spot where I stood in real-life and work from that basis.
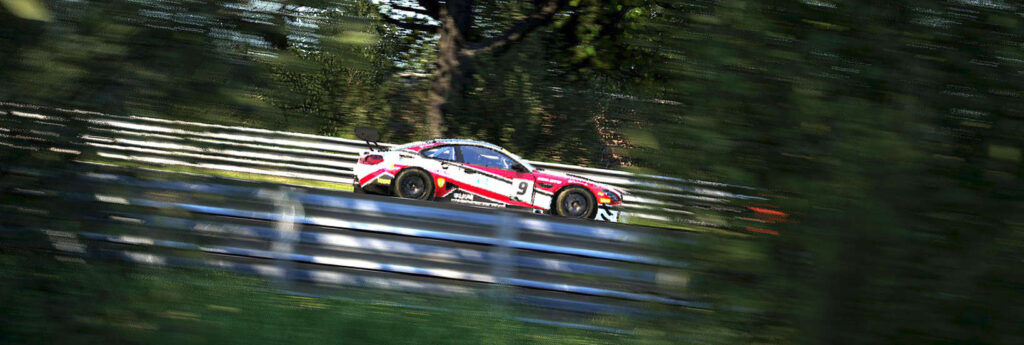
There are a couple of limitations, however, as you can see a lot of distortion on the BMW M6 GT3 screenshot caused by panning through the trees at Oulton Park. The game engine was presumably unable to cope with the foliage and motion blur at the same time, which created a few rough edges.
It also isn’t possible to ‘spot focus’ on the front or back of the car as seen in the following example. In real life, I’ve been able to focus on the front of the car, and through panning at a slow shutter speed display some motion blur at the rear of the car. However, in ACC the whole car stays in focus (except for the wheels). In my opinion, this is something that GT Sport, for example, really nails.
Real life
ACC
But despite the limitations in ACC’s screenshot mode, it can undeniably produce excellent images. Although the user interface is a little clunky at the moment, the current console version behind the pace and some of the settings a little vague, the final results can look very realistic indeed.
Happy snapping!
For more of my real-life motorsport photos – including all of the above – you can visit Ross’ Facebook Page.


Chat with the Community
Sign Up To CommentIt's completely Free